Published On Aug 21, 2020
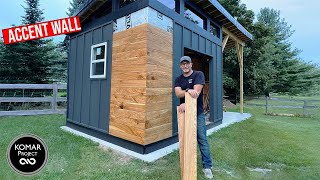
What's going one everyone!? in todays video I will be installing my own shiplap wall panels and installing them on my shop bathroom exterior walls.A good friend of mine was re-siding his home and removed all these old tongue and groove cedar siding boards, he gave them to me for free. In this video I will be showing you how to turn these into shiplap panels.
These boards ranged in varying lengths anywhere from about 4' to 10' long, roughly 8" wide, and about 5/8" to 3/4" thick.The first thing I did was thoroughly check each board for nails, staples and screws and removing them (the last thing you want is to find those during your milling stages I did miss one tiny nail 🤦🏻♂️). Then I cut off the old tongue and groove joints, and rip them down to a consistent width of 7". With the boards now all being 7" wide and in varying lengths it was time for me to get them to a consistent thickness. with the boards roughly being 3/4"-ish in thickness I decide on running them through my thickness planer to make them all 1/2" thick. This would give me plenty of remaining material to cut my shiplap joints in, and keep a nice thick look to the wall.
Now that all the boards are the same thickness, and width it was time to move on to cutting the shiplap joints. To do this I started off by making a sacrificial fence for my table saw. although this step isn't fully necessary this will give you a cleaner, and more precise cut. I started by measuring the height and width of my table saw fence, and cut some scrap 1/2" baltic birch plywood into 3 pieces. 2 that were the same height as my table saw fence, and one about 1" wider than my table saw fence (to accommodate the two 1/2" thick side pieces). After that I pin nailed and glued them together using the fence as a mold. once the glue was dried I waxed the blade side of the new fence and secured it with some # 6x 3/4" screws on the opposite side so it wouldn't shift while making my shiplap cuts. I then installed a 1/2" dado stack, and a zero clearance insert plate in my table saw with the blade fully recessed then turned the saw on and raised the blade cutting a 1/2" opening in the new zero clearance plate. (this will help eliminate tearout, and allow for a precise cut. after that I moved my fence until it was flush with the 1/2" slot in my table saw insert plate. One thing I didn't talk about in the video is the little half circle piece I screws to the fence just before the fade. This helped keep the boards flat as they passed over the blade, providing a constant depth of cut for the half lap joints do to the natural bows these boards had/allowing me to control the boards do to some of the board being 10' in length.
After all the shiplap joints were cut, it was on to installing the panels. its pretty staright forward I marked out all my stud locations prior, then I just cut the panels at random length making sure my seems never lined up. Use your imagination here and agin don't let your seems line up "make sure they're staggered".
after all my panels were installed I re-sawed some scrap 2x4 pine lumber on my table saw at 1"2' to match my door trim, and BOOM! you have a shiplapped wall!
tools I used
table saw
miter saw
thickness planer
router (with a 1"x1/4" flush trim bit)
dado stack (in the table saw for the shiplap joints) or a router and router table
chisel
handsaw
pneumatic finish nailer
#SHIPLAP #DIY #BREWBUILDS