Published On Jan 7, 2019
Click for more info and reviews of this CURT RV and Camper Hitch:
https://www.etrailer.com/RV-and-Campe...
https://www.etrailer.com
Don’t forget to subscribe!
/ etrailertv
Full transcript: https://www.etrailer.com/tv-install-t...
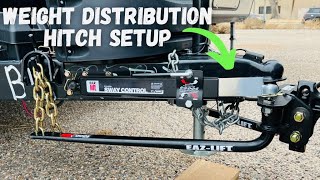
Speaker 1: Today on this 2017 Forest River Rockwood Mini Lite Trailer, we're going to review and install the adjustable width trailer hitch receiver for RVs, part number 13703. This is what the hitch looks like when it's installed on the back of our RV, here. Notice, it does sit pretty far back, due to the construction of the trailer. With our opening, right here, we got plenty of room between the bumper and the hitch. That will give us a lot of room for any accessories you put into the hitch.As you can see, here, a customer has another hitch mounted to this tube, right here. However, the problem he's running into is that his accessory is too heavy and it's actually twisting his bumper as he goes up and down the road.
This is a very good replacement for that problem.The weight capacity on our hitch is going to be rated for 350 pounds, which the weight pushing down on the hitch, like here. If this was on a motorhome, you could actually use this for pulling a trailer, and it's got a pull weight of 3500 pounds. I'll give you some measurements that will help you out in selecting some accessories. From of the receiver opening, down to the ground, will be about 19 inches, and from the center of the hitch pin hole, to the edge of the bumper, not counting the spare tire, if you have one, is going to be about nine inches.Now, our hitch is going to be a universal fit. It does require some drilling, in fact, you're going to drill about eight holes, counting both sides, and then two more for the hitch to your brackets.
This is a universal fit, so you can also use this on other recreational vehicles or motorhomes. You can see on our trailer here, this works quite nicely with the I-beam construction of a trailer frame. On other trailers, if you try this out, this will work on C-channel frames as well as box frames, as well.The first part of our install is we have to get underneath the RV, and there's an under panel at the very bottom, you have to remove to get out of way, so you have easy access to the frame on the inside. These screws that hold the panel in place require a three-eighths socket. We'll remove them all the way across, taking this piece off.
Now we'll make our way down the side of the frame, removing these fasteners. Now these fasteners are using a Phillips head bit, so it comes off pretty easy. There's a mixture of fasteners on this trailer. Sometimes the fastener they're using here is just actually just shot into the steel, so you have to break the head of it and reinstall a new fastener in a relatively close area to it.We'll continue on, going all the way down the side, probably about three or four foot. We'll do this on both sides of the trailer.
We have this fitting, right here, that we have to loosen up. It's just got some screws holding it in place, as well. We'll be using a three-eighths socket to remove them, and we'll temporarily move this out of the way. We'll take this panel, now that it's loose, and we'll simply push it down and out of the way.Let's take one of our brackets, that come with the hitch, and do a quick test fit to see if there's anything in the way. We'll look at the passenger side. This bracket is intended to sit up on the inside edge of the I-beam, here. We'll hold it up against it and then slide it back as far as we can, to give you an idea where it's going to mount up at. We got plenty of room, here, on a passenger side. On our driver's side, here, we got the wire harness in the way. So I'm going to use a three-eighths socket one more time to remove it.We'll just let that stay loose, for now, and leave it just like that. We'll double-check with our bracket to make sure it fits okay. Okay, it looks like we've got plenty of room to install it. Let's grab the center section of our hitch and put it loosely into the end brackets. We're just going to slide them in loosely, just like that, for now. We'll do the other side, as well. Let's take our hitch down and grab an extra set of hands. We'll carefully pick it up, slide the brackets into the frame, and make sure it doesn't come off the center section, and we'll clamp it in place using some clamps. There.Now, when you put this up there, we'll try to slide it as far to the back as possible. If you look on the outside edge of the frame, you'll see this gusset, here. This may get in the way of the holes that you drill for the hitch to come out this way. To make room for that gusset, I'm going to take the hitch and scoot it back about one inch. Still get us pretty close to the gusset, but still have enough room for hardware. Once we're satisfied of the position of t