Published On Sep 15, 2020
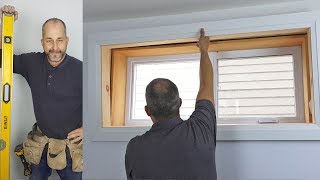
EASY DIY, great home improvement demonstration on building and installing a window sill and apron in a DR HORTON new residential home. Step by step, I will take you through the entire process to get the job done right and level the first time!
0:00 Intro
0:40 Measuring window for Sill and Apron Dementions
2:11 Cutting Window Sill and Apron length
3:50 Using Dewalt 10” Table Saw to “rip” depth of Window Sill
4:58 Using Dewalt Router to give the Window Sill a detailed “nosing”
7:27 Scribing Window Sill to Window opening
10:37 Using Dewalt Jigsaw to cut scribe of Window Sill
12:14 Installing Window Sill into opening
17:20 Installing Apron and quick sanding by hand (FINAL STEP)
18:30 Installing Window Sill at my normal everyday speed
20:15 Final thanks for watching (AND SUBSCRIBE PLEASE)
*********PLEASE NOTE*********
I am a professional at using these tools. Please use the proper safety equipment and refer to the manual for additional operating instructions.
TOOLS USED:
OCCIDENTAL LEATHER Tool Bag - https://amzn.to/3q8YBJy
TAPE MEASURE SUSPENDERS - https://amzn.to/30GwjgO
STANLEY 25ft. FatMax Tape Measure - https://amzn.to/3yHzqSi
DEWALT 12-inch Miter Saw - https://amzn.to/3J6FnwL
DEWALT Miter Saw Stand - https://amzn.to/3sk2gXC
DEWALT 10-inch Table Saw - https://amzn.to/3EgltM5
DEWALT 20v Max Cordless Drill - https://amzn.to/3yJNSsN
- 10pc. Combo Kit - https://amzn.to/3FbgGgw
DEWALT 20V Max Cordless Router - https://amzn.to/3slXGrY
DEWALT 20V Max Cordless Jigsaw - https://amzn.to/3Eb4XgG
METABO 16Ga Finish Nailer - https://amzn.to/3e9dFkJ
METABO 18Ga Finish Nailer - https://amzn.to/3J715RA
METABO Air Hose 100ft. 1/4”- https://amzn.to/3qcmgcc
STABILA Levels 6pc. w/ Nylon Case - https://amzn.to/32fIBNB
Thanks for taking the time! I just want to touch on a couple things here that may help with the process.
I start with my Stanley tape measure to get our dimensions of the Window Sill and Apron.
Opening (from drywall to drywall) + 3” = WINDOW SILL
Window Sill - 1” = APRON
frame of window to finished edge of drywall + 1 1/2” = WINDOW SILL DEPTH
Next, using my Dewalt 12” Miter Saw I cut the length of my 1x8 material for the window sill. Then cut the length of my apron using a 15 degree cut on the ends. Like I said this is the specifications that DR HORTON requires us to do.
Then using the Dewalt 10” table saw I rip my piece to 6 3/4” or overall depth for this particular window. Real easy for me to set the “fence” of the table saw into position and just lock it in. Make sure when you are using a table saw you always maintain pressure on the material pushing it down and to the “fence”. ALWAYS ALWAYS ALWAYS hold pressure to the piece between the blade and the “fence”, if not the material may bind and shoot back at you!!!! Your window WILL most likely be different dimensions so please use my easy math to get yours RIGHT.
Next, Routing our material. Don’t be afraid of this step! Yes it requires the tool, which in my case is the Dewalt 20v Router. Just follow the instructions to set the router bit in the tool correctly and set the depth. Maybe try on a scrap piece a couple times to get your profile right. Listen and watch this part of the video if you need good explanation of how to hold and what to focus on while using the tool.
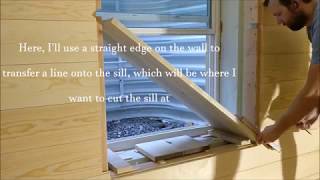
On to scribing the Window Sill. I use a speed square to help with verifying my pencil lines and determining if the drywall is square to the window. Remember 3” larger so split the difference 1 1/2” each side for the “ears”. Once you get the window sill centered continue to hold pressure so it doesn’t move while you figure out the angles. Draw your lines and cut out the back corner pieces, I use a Dewalt 20V Jigsaw to make it easy.
Installing the Window Sill does require some focus, but we can DO IT! DO IT NOW! Start with getting your reveal in one corner of the sill and then level that side. Move across the sill to match your reveal against the window until you get to the other side. Level that side as well with a handy Stabila speed level. Then with a larger level place on the front of the sill and verify the front is level and straight. I use a screwdriver to pry and hold my material when shooting any nails so my material doesn’t move when firing the Metabo 2 1/2” 16 ga. nail gun. The apron is very easy in our case here, just center it under the window sill and nail it snug up to the bottom. After caulking and paint your new Window Sill will be ready to go!
Thank you so much for watching
Please LIKE, SUBSCRIBE, turn on that BELL, and also leave feedback!
That’s it for now see ya soon!