Published On Jun 7, 2020
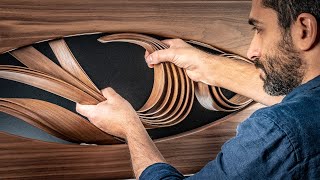
Watch and learn how to build closet doors in a shabby chic style. You will see the whole process from selecting lumber to the final installation in the customer’s home. If you’re looking to take on a project like this, here are some of the supplies that are challenging to find:
Decorative Corner Appliques - https://amzn.to/2AKZwdj
Moulding - Astragal Mould (must cut strips down on table saw) - https://amzn.to/3gYxUSt
Applique Example for Door Pull Escutcheon Plates - https://amzn.to/2A8tc3Z
Purchases using these Amazon Affiliate links help provide funding for our video production work.
The steps to build these doors are as follows:
1) Select the lumber in the lumber yard, ideally the exact thickness for what you need
2) If required, plane down the lumber to the desired thickness
Dado the rails (horizontal pieces) and stiles (vertical pieces) for 1/2 inch plywood
3) Rip the plywood to the desired width and assemble it in the stiles
4) Measure the stile dimensions to cut the tenons
5) Cut the tenons to match the dados in the stiles - you want a friction fit so the pieces stay together without falling apart, but not too tight that you might split the wood
6) Cut the panels to length
7) Assemble the door as a dry fit (without glue) to test how everything comes together
8) Glue up the doors
9) For double doors, bevel the edge of the door on the opposite side of the hinge
Steps to add the shabby chic decorative mouldings to the doors:
1) Rip astragal moulding to small sections needed on the inside of the door frame
2) Miter the moulding to fit on the inside of the door frame
3) Mark where the corner appliques need to be cut out of the moulding
4) Cut out these sections of the moulding using a table saw and a carving knife
5) Make sure to number the location of each corner applique in case they are different sizes
6) Glue in the moulding and corner appliques
7) Layout the door pull escutcheon plates and glue in place
Steps for finishing the closet doors:
1) Sand all the parts smooth
2) Sand the outside edges of the door to slightly round them over to make them feel nice
3) Using a thick primer and a brush, paint the appliques so the seams blend in with the door
4) Sand all the primed areas
5) Prime the whole door with a quality primer
6) Sand down the primer to ensure it is smooth
7) Paint the doors with a quality paint
Our woodworking plans - https://woodenitbenice.ca/collections...
Our 1-on-1 woodworking advice sessions - https://woodenitbenice.ca/collections...
See the tools we use in our workshop and the tools we recommend: https://www.amazon.com/shop/homeimpro...
🇨🇦 Canadian link - https://www.amazon.ca/shop/homeimprov...
For more woodworking knowledge or to contact us directly, visit our website https://WoodenItBeNice.ca Hosted by Scott Bennett, owner of Wooden It Be Nice in Brooklin, Ontario, Canada
#woodworking #howto #door