Published On Jun 15, 2019
materials and tools:
gloves: https://amzn.to/2FbpWEd
folding ruler: https://amzn.to/2Fb7ZWu
h-anchor post base: https://amzn.to/31yZoq3
screwdriver: https://amzn.to/2RhSvVn
flat shovel: https://amzn.to/31w1V4x
spade: https://amzn.to/3auDBFa
wheelbarrow: https://amzn.to/31yWZM9
concrete mix: https://amzn.to/35Bk3xg
watering can: https://amzn.to/2XnxPkx
spirit level: https://amzn.to/2Kl4YXY
wood stain waterproof: https://amzn.to/2WHcQob
brush: https://amzn.to/2RgAwyN
trowel: https://amzn.to/2IHE6Oj
tampers: https://amzn.to/2WKtIKB
angle grinder large: https://amzn.to/2RjnH6B
grinder case box: https://amzn.to/31yUpps
rubber mallet hammer: https://amzn.to/31B0n9a
broom: https://amzn.to/2IPDg2m
f-clamp: https://amzn.to/2MOUstM
fence elbow connector: https://amzn.to/3nAqyqw
dowels: https://amzn.to/2HNqy60
screw set: https://amzn.to/2FO4czf
power drill: https://amzn.to/2IKYoXh
drill bit set: https://amzn.to/2WwlndV
hammer cross pein: https://amzn.to/2Xj18nW
cordless drill: https://amzn.to/38EhGfk
wood drill bits: https://amzn.to/2RqGkG5
hex bolts: https://amzn.to/2MOGPLl
wrench socket set: https://amzn.to/2KT0irM
4k Gopro: https://amzn.to/3878qAx
Gopro head strap: https://amzn.to/2XzhR7A
Gopro bicycle mount: https://amzn.to/2xDfK3l
Tripod: https://amzn.to/34NcAvm
The links above are affiliate links that belong to Amazon or Ebay partner programs. If you buy something through these links, I will receive a commission, of course without you having to pay anything more. Thanks for your support!
For contact options and links check my channel info,
Thank you for your interest in my videos!
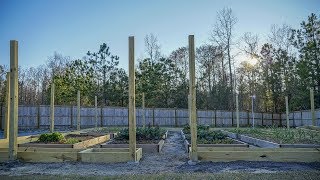
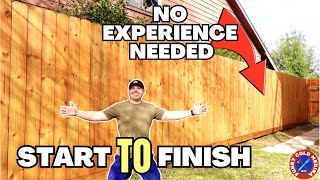
Hello and welcome, I’m Carl the landscape guy. Today we will install a wooden basket weave fence as a privacy screen. To start off, we have to install a foundation with a H-anchor post base and a fence post. On the other side, the wood fence is fixed to the wall. I use oil chalk and mark the foundation's position from the wall. The length for this fence element is 1.80 meters. I add 1 cm on each side for mounting. Now I mark the approximate location for the foundation with chalk on the pavers. The post base will be set into the concrete foundation. With the help of two screwdrivers, I take out the first paver. This can be a bit difficult. But then the other pavers come out relatively easily. I open an area of about 50 x 50 cm in the pavement. I start digging the hole for the foundation with a flat shovel. The hole will be 25 x 25 cm and I plan on making it about 70 cm deep. It makes sense to deepen the hole with a spade. I smoothen the sides and make sure no loose material remains in the hole. Once the hole has been excavated, the foundation concrete can be mixed. I use this ready mixed concrete where only water must be added. Now I’m putting the concrete into the hole. If you have a few chunks of old building rubble you can use this and save a few shovelfuls. I now use a hand compactor. Compacting is very important because only then does the foundation receive the necessary strength. We still need a little more concrete because the H-anchor sits too deep. The post is supposed to be above the pavement level. So I add a little bit and then put the H-anchor back in. Here it is important not to pour too much concrete. I keep the concrete level lower than the paving stones. Make sure to check the alignment and distances again. If the foundation gets a little dry, it makes sense to add some water. Don't put too much because you don't want to flush away the concrete. The water also makes the concrete stick to the achor properly. So our foundation is all set and now has to harden. The concrete is fully cured after 28 days, but we can put our fence up after 24 hours. If you do not want to wait, you can also use the more expensive quick-setting concrete. That stuff hardens in a couple hours and you can mount your fence on the same day. I pass the time by painting the fence. In this case, I want the fence to match the anthracite roof color of the house. I use a wood preservation glaze in the color "ebony". The post is also treated with the same color. This stuff makes the wood last much longer. Re-moistening the concrete the next day helps the curing process to proceed. However, it’s hard enough so that we can put the pavers back in place. I make sure that no joint material remains on the pavers. If you leave them dirty you might not get them back in properly. Two pavers have to be cut. I mark the spots and use a disc grinder. A rubber hammer can be used to get rid of small height differences. I use clean sand to fill the joints. With a broom and some water, filling the joints is done quickly and properly. You can also use very dry joint sand to push the sand into the joints, but then you have to repeat that process a few times. Now I put the fence post in the H anchor and hold it in place with a clamp. That makes it easy to align it.
#fencing #woodweave #diy