Published On Jun 23, 2021
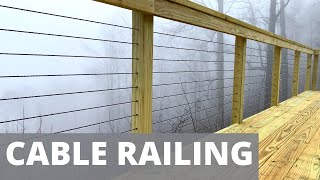
This DIY Wire Railing Installation video will show you everything you need to know to install a DIY cable railing for your deck. Specifically, you’ll learn:
1. How to set and install deck railing posts
2. How to make a template for your railing post holes.
3. How to drill into the railing posts for your DIY cable railing
4. How to run the cable / wire through the deck railing posts
5. Tips on having a continuous cable run through stairs
6. The Best Cable railing hardware to use
7. How to tighten the cable and adjust the wire railing tension
8. How to cut the excess bolt length.
Step 1: How to set and install deck railing posts
We installed our Deck Railing posts with an “inside mount” approach and then “picture framed” the edge board around the posts. To do this, we installed the railing posts such that the top cap of the railing would be at 38” (check local codes requirement as you may need to make yours 42” high depending on where you live). To fasten the posts to the deck, we Used Thrulock Screws which do not require any predrilling. Links to tools and materials used are below!
Step 2: How to make a template for your drill holes.
In order to ensure that all of our drill holes were exactly the same from post to post, we created a template with a scrap 2”x4” board. First, because we used 1/8” cable, we drilled 1/4” holes spaced every 3 inches (approximately) and located them directly in the center of the template board. Please check your local code requirements for cable railings.Once your template is ready, use clamps to attach the template to your deck railing posts and mark the holes on the post. Be sure to mark both sides of the post with your template.
Step 3: How to drill into the railing posts for your DIY cable railing
At this point, use a drill bit that is slightly larger than the diameter of your cable and drill half way though the post in the exact place of where you marked it with your template. Be sure to hold the drill level and make sure you are in the exact center of the post. Next, move to the other side of the post and drill in halfway, meeting the previously drilled hole in the center.
Step 4: How to run the cable / wire through the deck railing posts
Simply run the wire railing though the holes in the post and cut to length.
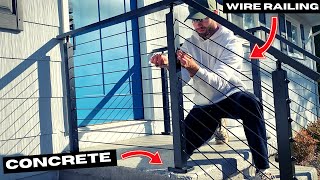
Step 5: Tips on having a continuous cable run through stairs
Having a continuous run through the stairs was a bit tricky. I would recommend that you have a dedicated set of hardware through the stair railing – It will make your life simpler. But if you want to save the money, you can follow what we did in the video. It is a little confusing in the video, but I hope that what you see will get the creative juices flowing so that you can come up with your own solution!
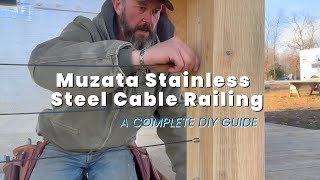
Step 6: Best Cable railing hardware to use
For our Project, we used the 1/8” Type 316 (Rust Proof) Stainless Steel (included a cable cutter with purchase), Muzata Cable Railing Kit Hardware, and a Hydraulic Crimping Tool. All tools were purchased on AMAZON and links are provided below.
Step 7: How to tighten the cable and adjust the cable railing tension
Once the cable is run through the railing, simply insert the Muzata hardware in both posts at the beginning and end of the cable run. Insert the cable into the hardware and then crimp the cable in place. Then, thread the washer and nut on the opposite side of the post and tighten the nut with a wrench as necessary to get your desired cable tension.
Step 8: How to cut the excess bolt length.
Once the cable tension is to your liking, cut off the excess bolt length with an angle grinder or a reciprocating saw. You will obviously need a metal blade for this. Once the excess length has been removed, thread on the decorative hardware end cap, and your DIY Wire Railing Installation is complete.
TOOLS Used in this project and Total Cost:
All in all, the wire railing materials cost me $155 for the Stainless Steel Cable, Muzata Hardware, and hydraulic crimping tool.
Affiliate links to the exact products I used are linked below:
Hydraulic Cable Crimping Tool:
https://amzn.to/2SXMz9p
316 Stainless Steel Cable (includes cutter)
https://amzn.to/3j1lJYD
Muzata Cable Railing Kit Hardware:
https://amzn.to/3wTEa5y
Thrulock Screws:
https://amzn.to/2TXi1EF
Thank you guys so much for watching! If this video helped you out, please consider dropping a “like” below to help this video get recommended. Also, please subscribe if you like content like this – it helps me out a ton.
This is Episode 6 in my BACKYARD TRANSFORMATION SERIES.
Check out the other episodes below:
Episode 1: DIY Fence on a Budget
• DIY Fence On a Budget!
Episode 2: How to Build a Fence Gate (DIY Fence Gate Ideas) • DIY Fence Gate Ideas (How to Build a ...
Episode 3: How to Extend a Concrete Slab
• How to Extend Concrete Slab (Lessons ...
Episode 4: DIY Concrete Paver Patio
• DIY Concrete Paver Patio (Simple and ...
Episode 5: DIY Trash Can Screen // Horizontal Privacy Screen • DIY Trash Can Screen // Horizontal Pr...