Published On Mar 1, 2023
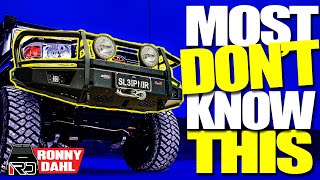
In this video I will show you how to remove an ARB bull bar by yourself. It is better to remove a bull bar with two people, but if that isn't an option there is a way to do it using car stands, trolley jacks or other lifting aids.
Note that bull bars are heavy and if you're no comfortable with 50-60kg of weight (more with winches) then this is not a good method for you.
I have an ARB deluxe bull bar so the brackets, nuts and bolts etc will be specific for the removal of an ARB deluxe bar, but the principle can apply to any bull bar removal.
⋄⋄⋄ TOOLS & EQUIPMENT ⋄⋄⋄
▻ Trolley jack: https://geni.us/tbt-3-ton-trolley-jack
▻ Car stands: https://geni.us/tbt-3-ton-car-stands
▻ Socket & spanner kit: https://geni.us/bahco-S106-socket-set
▻ Loctite 243: https://geni.us/tbt-loctite-243
▻ 1/2" Torque wrench: https://geni.us/tbt-torque-wrench-nm
=== GEAR I USE TO FILM AND EDIT ===
–– CAMERAS & LENSES ––
▻ Camera 1: https://geni.us/tbt-sony-alpha-a1
▻ Camera 2: https://geni.us/tbt-sony-a7iv
▻ Wide Angle Prime: https://geni.us/tbt-sony-24-gm-prime
▻ Nifty Fifty: https://geni.us/tbt-sony-fe-55mm-f18
▻ Wide Angle Zoom: https://geni.us/tbt-sony-16to35mm-f4
▻ Drone: https://geni.us/tbt-dji-mavic-3-flym
▻ Action Camera: https://geni.us/tbt-gopro-hero-10
▻ 360° Camera: https://geni.us/tbt-insta360-one-x
▻ Telephoto Lens: https://geni.us/tbt-sony-70to300
–– AUDIO ––
▻ Wireless Recorder: https://geni.us/tbt-rode-wireless-go-2
▻ Sound Recorder: https://geni.us/tbt-zoom-h1n
▻ Shotgun Mic (studio): https://geni.us/tbt-rode-videomic-ntg
▻ Shotgun Mic (travel): https://geni.us/tbt-sony-ecm-b1m
▻ Headphones: https://geni.us/tbt-sony-wh1000xm3
▻ Lavalier Microphone: https://geni.us/tbt-rode-lavalier-go
▻ GoPro Mic: https://geni.us/tbt-hero10-media-mod
–– EDITING ––
▻ Laptop: https://geni.us/tbt-macbookpro-m1max
▻ Monitor 1: https://geni.us/tbt-dell-u2720q
▻ Monitor 2: https://geni.us/tbt-benq-ew3270u
▻ Mouse: https://geni.us/tbt-logitech-mxmaster3
▻ Keyboard: https://geni.us/tbt-logitech-mx-keys
▻ Trackpad: https://geni.us/tbt-magic-trackpad
▻ Portable SSD: https://geni.us/tbt-sandisk-2tb-ssd
▻ USB-C Hub: https://geni.us/tbt-satechi-usbc-hub
▻ SD Card Reader: https://geni.us/tbt-satechi-cardreader
–– LIGHTING ––
▻ Key Light: https://geni.us/tbt-aputure-p60c
▻ Fill Light: https://geni.us/tbt-neewer-660led
▻ Travel Light: https://geni.us/tbt-aputure-mc
▻ C-Stand: https://geni.us/tbt-neewer-c-stand
▻ GoPro Light: https://geni.us/tbt-gopro-light-mod
–– ACCESSORIES & MOUNTS ––
▻ Camera Bag 1: https://geni.us/tbt-shimoda-action-x50
▻ Camera Bag 2: https://geni.us/tbt-shimoda-explore-35
▻ Gimbal: https://geni.us/tbt-zhiyun-weebill-s
▻ Drone Controller: https://geni.us/tbt-dji-rc-pro
▻ Tripod (Travel): https://geni.us/tbt-3lt-brian-tripod
▻ Tripod (Studio): https://geni.us/tbt-tripod-kfconcept
▻ Tech Pouch: https://geni.us/tbt-tech-pouch
▻ Colour Checker: https://geni.us/tbt-xritepassportvideo
▻ SD Card Case: https://geni.us/tbt-memorycard-case
▻ Camera Sling: https://geni.us/tbt-sling-peakdesign
▻ Accessory Pouch: https://geni.us/tbt-shimoda-accessory
▻ ND Filters: https://geni.us/tbt-freewell-nd-magnet
▻ GoPro Suction: https://geni.us/gopro-suction-mount
▻ GoPro Magnetic Clip: https://geni.us/tbt-gopro-swivelmagnet
=== TABLE OF CONTENTS ===
00:00 - What this video covers.
00:10 - Tools required.
00:20 - Recommended method.
01:16 - This method isn't suited to all people.
02:18 - Overview of the fitting instructions.
04:45 - Remove wings, stone shields and wheel guard screw.
05:35 - Understanding which part of the bull bar is the bull bar, the bracket and the chassis.
06:25 - Mark the bull bar outline to keep the level of the bull bar.
06:40 - Disconnect or remove all light fittings and other electrical connections.
06:52 - Remove grill, lights, bonnet latch cover.
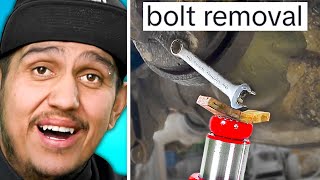
08:23 - Setting up car stands, breaking bolt tension and separating the bar.
10:05 - Put car in neutral and push car backwards.
11:00 - Look out for this edge on the bull bar.
11:20 - Removing the chassis bracket.
14:13 - Re-installation of the bull bar.
16:42 - Closing thoughts.
|| ALSO ACTIVE ON ||
◦ Website: https://thebrownetown.com
◦ Instagram: / thebrownetown
|| FOR THOSE WHO CHOOSE TO DONATE ||
▻ https://paypal.me/TheBrowneTown
**Disclosure
Links are affiliate links. Through partnerships with Amazon, eBay and others I earn a small commission from purchases made through these links. There are no extra costs for you but it does help support the channel in a small way.