Published On Jan 22, 2021
See how to layout your hand tools in a woodworking tool cabinet. It's like a 3D jigsaw puzzle and it can be confusing. Watch how I select tools, designs the tool holders, and builds the storage in this tool cabinet.
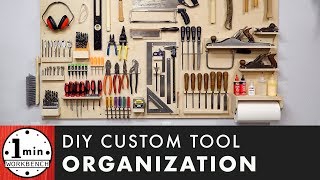
I use an adjustable tool storage solution I created using vertical supports and pins. I developed this because I want to be able to change the configuration in the future if I acquire different tools. I also designed it in a way that the screws are hidden to give it a clean, refined look.
I've previously installed tool holders in the body of the tool cabinet and on the left door. I'm now trying to decide what tools to make tool holders for on the right door. I start by pulling out the tools that I think might be good to organize on that door.
I made the easiest decisions first. I made a file holder for the bottom of the door, similar to what I did with my chisel holder on the other door. I also made a mallet holder in the top corner because the mallet is so bulky and it seemed like a good spot to place it. Then what? That's part of the challenge of laying out a tool storage cabinet. This is a puzzle to determine what tools to put in the space. I like to group common tools so they're located together. This organization allows me to easily find what I'm looking for.
After looking at the tools I had on my workbench, I decided to make tool holders for my hand saws. I mocked up the space with painters tape on my workbench and started placing the saws in different spots to make the most efficient use of the space. Once I was happy with the layout, I needed to decide where to put the shelves to support the saws. I measured for the shelf dimensions and cut out the parts.
The verticals supports have pins on either end to lock into the shelves. The larger top pins are used to install a screw to hold the supports in place while concealing the screws. This gives the woodworking tool cabinet a quality finished look.
With the 2D layout set, I marked the areas to notch out for the tools. Next, it was time to solve the 3D aspect of the tool holders - how deep to make the notches for each tool. I used magnetic standoffs to hold the blades of the saws, so the standoff was my starting point to determine the depth of each saw handle.
I cut out the notches in the shelves and test fit them. Then I created and installed the magnetic standoffs for the saw blades. The last part was to fill and empty space in the tool cabinet door. I looked around the shop to find what would fit in that area and discovered my mini files would fit there.
I created the mini file holder using a technique called additive woodworking. Most of this project used subtractive woodworking, where I cut pieces out of the wood. Additive woodworking is building up parts to make something. I cut multiple pieces of 1/4 cherry at a 10 degree angle and glued them on a board, spaced apart by screws. After it was clamped and dried, I had a file holder.
I applied a coat of linseed oil and two coats of garnet shellac.
I installed the tools holders and loaded up the tools with a smile on my face. It felt so good to have these tools stored in a safe place that is easily accessible at my workbench. I'm proud of how this tool storage cabinet is coming along. I still have a few more things to do, but it is working well and has made me more efficient because my tools are accessible. If you'd like to watch how this woodworking tool cabinet was deigned and built, here are each of the videos:
See all the videos in this series in one play list • Woodworking Tool Cabinet for Hand Too...
Part 1 - Woodworker's Hand Tool Cabinet • Tool Cabinet Build for Tool Storage a...
Part 2 - Stopped Miter on Woodworking Tool Cabinet • Wall-Hanging Tool Chest - Part 2 - Cu...
Part 3 - How to Build Curved Drawer Dividers • Building Curved Drawer Dividers for t...
Part 4 - Curved Drawer Fronts for Tool Cabinet • Curved Drawer Fronts - Woodworking Ha...
Part 5 - Building Curved Drawers for Tool Cabinet • Building Curved Drawers for the Tool ...
Part 6 - Tool Cabinet Door Build with Lock Miter Joinery • Tool Cabinet Door Build with Lock Mit...
Part 7 - Finishing & Hanging the Tool Cabinet Organizer • Finishing and Hanging the New Tool Ca...
Part 8 - Making a Spokeshave and Drawknife Holder • Spokeshave Holder in Hand Tool Cabine...
Part 9 - Organizing Tools in 1/2 of the Tool Cabinet • Tool Organizer for Tool Chest - Woodw...
Our Newsletter - Sign up at https://WoodenItBeNice.ca
Our 1-on-1 woodworking advice sessions - https://woodenitbenice.ca/collections...
See the tools we use in our workshop and the tools we recommend: https://www.amazon.com/shop/homeimpro...
🇨🇦 Canadian link - https://www.amazon.ca/shop/homeimprov...
For more woodworking knowledge or to contact us directly, visit our website https://WoodenItBeNice.ca Hosted by Scott Bennett, owner of Wooden It Be Nice in Brooklin, Ontario, Canada
#Woodworking #handtools #toolstorage