Published On May 12, 2020
Brought to you by https://www.ronhazelton.com/
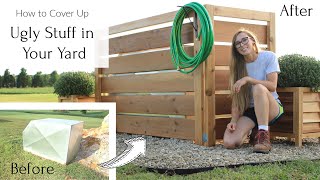
Learn how to construct an outside garbage enclosure that is attractive and animal-resistant.
Build a garbage storage enclosure outdoors, out-of-sight, and out-of-reach to the creatures who view the garbage as a tasty meal.
The enclosure consists primarily of a cabinet with a hinged lid and front-opening doors that both allow easy access to the garbage cans.
The structure will sit on a base frame of pressure-treated two-by-fours and decking.
Painted tongue-and-groove panels will cover the upper frame of the enclosure to create a convenient, good looking, and tamper-proof place to storage the trash until the scheduled weekly garbage pickup.
Check Out Our Site: https://www.ronhazelton.com
Transcript:
Now, I don't know how things work around your place, but here we get a very important visit once a week. Yep, Tuesday is garbage pickup day. When that truck pulls away, I can almost feel the weight lifting from my shoulders. That's because for six days, our trash has been piling up and piling up. What I need is a place to store it that's outdoors, out of sight and out of reach of the little critters who regard it as a tempting meal. So today I'm building an outside trash enclosure that's convenient, good looking and tamper proof. Now, come on over here and let me show you what I have in mind.
I'm going to start with a base frame like this, made out of pressure treated lumber. Then I'll add some decking on top of that, we'll put on some side frames, a back frame and a front rail that'll pretty much give us the structure and then some side walls or skins and a back and a front, the doors and the lid. So let's start by building this base frame.
Since the base is going to be in contact with the ground I'm going to make it out of pressure treated lumber. I've cut out all the pieces from my base here and it's time to hook everything together. Everything seems to fit so let's get these out of the way for the time being. I'm going to start by putting this end piece on. These holes that I'm drilling right now are called clearance or schenkels. It just allows these crews to go through a little more quickly and not to bite in that first piece of wood. This is a hammer drill and it's really nice for driving in long screws. OK, I've got my outer frame done now, so let's see how these fit right here. I don't mind if they're snug, I kind of like that. Almost there. Rotate this one more time. There's our base frame, that's what we had over here on the computer.
Now for our next step, I'm going to be adding some decking around the top. The decking will be cut to length from inch and a quarter thick pressure treated planks. I'm going to make this flush on the ends and flush on the side. Now I'm not drilling shaker clearance holes for these screws because they're fairly short. The wood is soft and they are going in quite well. To allow for drainage I'm going to put an eighth of an inch gap between the boards. A 16 penny nail makes a perfect spacer. The final plank will have to be trimmed to fit. Three and five eighths ought to do it. So let's just go ahead and rip this down.
Well, there is our deck, as a matter of fact it looks just like it does over here on the computer. So here's what we're going to do next. We're going to add these two side frames right here. Again, I'm going to screw these pieces together.
So I think as an added precaution, as this is going to be outside I'm going to put a little glue on. This is a polyurethane glue, very good for exterior projects. Now, this is what urethane glue does when it dries. It kind of expands, kind of foams and it'll push out of a joint, so no problem though, if you just take a sharp knife you can just trim this right off and I'm going to do this all the way around here. Side frame number one and I'm just going to repeat the process for the other one.
OK, now it's time for me to add the back frame. Here we go, two sides and one back. Now it's time to attach the frames to the base. I find it easier to clamp them in place first, then secure them with rust resistant screws. I can see this is beginning to take shape now.
This is my back section here, we screw this first to the deck and then into the side frames. Now this part right here, the front is going to be open, but we are going to need a brace up here to tie these two corners together. With the frame complete I'm now ready to apply the paneling that will enclose it.
So let's start putting up this tongue and groove and I'm going to just put these up temporarily. Just take a pencil and just draw one line. Now, I'll take the panels down and trim each one to length by cutting to the line I've just drawn. This is construction adhesive and since this could move, expand and contract over time, I'm going to give myself extra insurance here, by just putting a bead up here. Let's just set this first board in place.