Published On Aug 6, 2017
Remote steering and gas control DIY 3D printed setup on my 20hp tohatsu, 10ft inflatable.
I used the motor on this boat for 3rd season now. All is great, but my left hand gets really tired after an hour or so of steering. I cannot change my position or use another hand.
This season I began looking for easy setup, portable solution, that would allow me to face forward and control the motor. After looking for some remote controls online I felt they would be too big for such a small boat and steering column would take much of precious space. I doubt they will be easily (dis)mounted. Also price tag for a brand new setup of a few 100s seems a bit discouraging.
I have two benches and decided to mount the steering wheel and gas lever on front one, run cables to the motor. So I got longest cables I can find (1.8m) that are used for brakes on a bicycle. I removed steel wire there as it is not long enough and has terminals on both ends. Instead I got an about 10m roll of twisted SS wire from HW store. Had to buy a few brass nuts and bolts. Because some part I already had laying around my total budged spent on this project was about $20-30. I happen to have a few bearings, SS wire, aluminum rod 10mm diameter, some SS scrap sheet, and some other minor hardware.
I also have a 3d printer. I used it a lot in the past year for various projects around the house. I never before printed a part more then a few centimetres in size and this is my first project of such big size.
Actually initially I was concerned about ability of the printed ABS plastic to withstand the forces, especially in steering components. On first attempt I went almost all metal. Doing a lot of welding and brazing. It went more or less OK, but looked ugly. Most importantly cables were permanently attached to a mount on the motor, so they were always in a way when I (dis)mounted or (un)loaded the motor.
I also tried to replicate classic steering design with a rod going through tilting rod (sorry don't know proper term), but found it would require many links and connections each adding a free play and would be difficult to make with tights gaps.
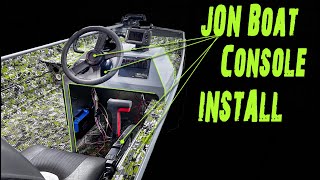
Final design I have so far, and I used it for about 5 trips now, is shown in this video. There are two plastic housings, containing a plastic gear, connected to the pair of cables. One cable turns gear one way the other. Housings are mounted to the motor with single bolt each. One goes to tiller, it happened to have a threaded hole at the bottom, close to the roller that pulls cables going to the carburetor. Housing for steering gear is mounted just below the tilting rod in the middle just at the top of transom. It has two parts, clamped around the rod with the bolt and seats there very firmly.
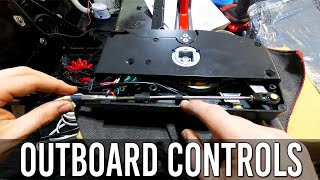
For gas control, I printed another gear about an 1in in dia, that slides on aluminum rod inside the tiller with small hole drilled through them both and pin inserted to keep it fixed.
For steering control I printed section (about 90 deg) of gear about 10in in dia. It's about 10mm in thickness, so it's very stiff anyways, but to make it even stronger I cut similar size SS sheet to hold it underneath. Sandwiched between SS sheet at the bottom and motor steering/caring handle at the top the plastic gear has no way to go and holds very strong. I printed it with big (about 7mm) thick teeth, so after about 4 hours of use it shows no wear and tear.
On the other side of the cables there are spools where they attached to. For steering components, because forces are greater I used aluminum rod and cut of metal pipe (from cheap spark plug key that I have plenty as they come with every garden power tool like lawn mower or snow blower). I mounted the rod on bearings that are housed in plastic enclosure, so there is no wear on the plastic when turning it. Out of the same aluminum rod I machined a little cable adjusting screw similar to one used on bicycle's brakes to tighten the cable. Similarly there is a cut of little SS sheet that distributes pressure exerted by the cable on the plastic housing to prevent damage.
Gas controls are under less force so there are more plastic parts there.
I think it will easily last me a season. Even though if some of plastic part breaks I can easily print a new one out of the CAD model. Or maybe make it more beefier next time.
On the video you can see controls are just screwed to a white board which is clamped to the front seat. Since I made the video, I added seat mounts for both steering wheel and gas lever, so now I can easily slide each of them left-right on the front seat if I need to.
Just shortly after that I made some 3D printed mounts for seat caution (it's camouflage color, back rest actually, bought one for just $10, not sure what it's used for but it's small and very light). Now I have very comfortable ride. Just this morning I went for more than 2 hours, covered some 70km and felt not tired at all.