Published On Aug 5, 2024
TONE CURVE
• TONE CURVE പഠിക്കാം: LIGHTROOM MOBILE...
HSL
• TONE CURVE പഠിക്കാം: LIGHTROOM MOBILE...
COLOUR WHEELS
• LIGHTROOM MOBILE Tutorial-Cinematic C...
RAW VS JPEG
• Photography Basics- RAW or JPEG? (Mal...
COLOUR THEORY
• COLOUR THEORY: കളേഴ്സിനെ പറ്റി പഠിക്...
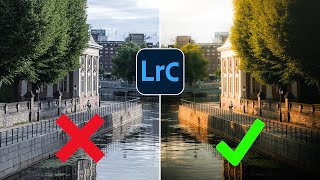
Raw photo editing in Lightroom is a powerful process that begins with understanding the fundamental differences between JPEG and RAW files. Unlike JPEGs, which are compressed and lose some data during the process, RAW files retain all the image data captured by the camera sensor, providing greater flexibility for editing. The first step in editing a RAW photo is often cropping, which allows you to frame the image precisely and remove any unwanted elements. After cropping, adjusting the exposure is crucial. This involves fine-tuning the brightness of the image to ensure that details are visible in both the highlights and shadows.
Following exposure adjustments, global adjustments come into play. These are broad changes that affect the entire image, such as contrast, highlights, shadows, whites, and blacks. These adjustments help in balancing the overall tone of the image. Once the global adjustments are set, colour grading begins. Lightroom offers several tools for this, including the HSL (Hue, Saturation, and Luminance) panel, colour wheels, and colour calibration. The HSL panel allows for precise control over individual colours, adjusting their hue, saturation, and luminance to achieve the desired look. Colour wheels offer a more intuitive way to adjust the colours by manipulating the shadows, midtones, and highlights independently. The colour calibration panel is particularly useful for fine-tuning the primary colours of the image, providing a solid foundation for accurate colour representation.
After the global adjustments and colour grading, local adjustments are the final step. These adjustments target specific areas of the image using various masking tools available in Lightroom. Masking can be done with brushes, radial filters, and graduated filters, allowing for precise control over specific parts of the image. For instance, you might use a brush to lighten a subject’s face without affecting the background, or a radial filter to enhance the light around a subject. This level of control ensures that the final image is polished and professional, with each element adjusted to perfection.
Overall, editing RAW photos in Lightroom involves a structured workflow that begins with basic adjustments and progresses to more detailed and creative changes, ensuring that the final image is of the highest quality possible.
Follow us on
www.soulfullandscapes.com
/ earth2stars
......................................................................................................
Gears used
Canon Eos R5
sigma 35mmf1.4
..........................................................................................................
My photography gears.
Canon Eos R5
Canon 16-35 f/4 (favourite landscape lens)
Tamron 24-70 f/2.8 G2
Tamron 100-400 f4.5 -6.3
Irix 15mm f/2.4 (My favorite Astro lens)
DJI Pocket 2
Tripod: Benro Rhino 34c
My editing Laptop: Asus Zephyrus G14
Editing Monitor: Asus pro art 278qv
...........................................................................................................
00:00 Intro
00:30 JPEG vs Raw
01:43 CROP
03:13 EXPOSURE
04:17 WB
05:38 GLOBAL ADJUSTMENTS
07:14 COLOUR GRADING
10:02 LOCAL ADJUSTMENT
13:22 BREAK
14:00 CONCLUSION