Published On Nov 21, 2021
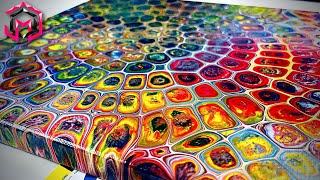
I am trying out this acrylic pour color combination and you can try it too! I figured this might be a cool series of tutorials to do.
So, when you do an acrylic pour, the consistency of your paint mixture is vital. All of your colors need to be the same consistency in order for it to flow when you blow it out.
Supplies used:
Plastic cups (large and small)
Stirrers i.e. popsicle sticks
Digital scale
Distilled water
Acrylic paint
Floetrol (Found at local hardware store)
Canvas 18"x24"
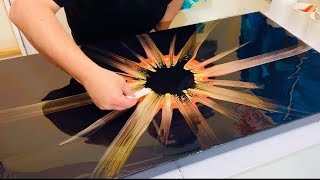
Blow dryer with concentrator nozzle
Painters tape
Push Pins
Plastic drop cloth
Small butane torch
Small mesh strainer
*Prep your pouring area by covering your table with a plastic drop cloth.
*Prep your canvas. Use painter's tape on the back of the frame of your canvas to keep it clean. Then use the push pins on the four corners so the canvas is elevated and doesn't sit it the paint that runs off the sides.
*Use the mesh strainer to strain the floetrol into a large cup before mixing with paint. It can sometimes contain lumps.
*I use a digital scale to weigh the mixture in grams. It works really well to get the proper consistency (think warm honey). The water amount may have to be increased slighly for higher viscosity paints.
Base Colors:
Black - Artist's Loft Soft Body Acrylic
Dioxazine Purple - Liquitex Basics
Mixture for each of the base colors:
180g Floetrol
90g Paint
65g Distilled water
Fire Color Combination in order:
Deep Red - Artist's Loft
Copper - Amsterdam
Cadmium Orange Hue - Liquitex Basics
24K Gold - Deco Art
Cadmium Yellow Deep Hue - Liquitex Basics
Titanium White - Amsterdam
Mixture for each small cup color:
30g Floetrol
15g Paint
12g Distilled water
I really hope you enjoyed this tutorial and found it helpful! Happy Pouring!!!