Published On Jan 27, 2022
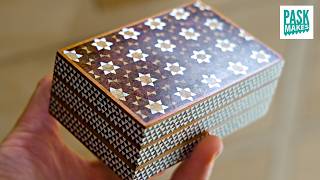
I have always wanted to try marquetry so I decided to give it a shot with this wood box project. The lid of the box has a fun diamond pattern that I created using Inkscape. This pattern allowed me to create the marquetry design and ensure all of my pieces lined up perfectly. I chose to use three colored wood species for my box lid. I used bloodwood, wenge, and maple. The thicker pieces, which were about 1/8” thick, made up the diamond marquetry design. But it needed to be broken up visually. I decided to add some white pinstripes but using maple veneer. Every piece of the marquetry pattern was press fit together and taped in place. I definitely would not call myself a marquetry expert, but after watching a few skilled people make their own marquetry patterns and pictures, I applied similar techniques and ended up with something that I’m proud of.
The marquetry pattern was only the first stage of the project. I also needed something for it to go onto. I made a wood box and used the pattern as the lid. The box is made from sapele, and has wenge splines. I spent a good amount of time deciding on the wood for the box. I needed a wood species that wasn’t good contrasting like walnut or maple. I felt like these would have been too much contrast compared to the diamond pattern. At the same time, I didn’t want a box that was the same colors as the pattern because it would take away from the marquetry work. I feel like sapele was a good balance because of the reddish / orange tint. It coordinates but doesn’t overwhelm the fancy lid that I made.
The liner inside is made from wenge and has mitered joinery. I installed some quality brass hinges. And then I applied a simple wax finish, buffed to a nice sheen.
--⏱️Timestamps⏱️--
0:00 Marquetry keepsake box
0:27 Shop-made veneer
0:46 Creating a marquetry pattern
4:20 Building a wood keepsake box
5:41 Veneering the box lid
8:26 Cutting splines
8:54 Cutting the lid off the box
9:46 Installing box hinges
11:43 Applying a wax finish
•• About NewtonMakes••
I’m Billy and I make fun things. Sometimes, it’s something I need like tool storage ideas. Other times it’s silly or nerdy stuff that I want to build. If you want to get ideas for making stuff, or just want to watch something entertaining then make sure you subscribe.
Like that sweet t-shirt I was wearing? Check it out here: https://newtonmakes.com/merch
•• My Links ••
Website: https://newtonmakes.com
Instagram: / newtonmakes
Facebook: / newtonmakes
Join this channel's Superhero membership to access perks:
/ newtonmakes
Here’s a list of tools and materials that I used to make this project. As an Amazon Associate I earn from qualifying purchases.
•• Tools & Materials ••
My Amazon Store: https://www.amazon.com/shop/newtonmakes
• Brass hinges: https://www.horton-brasses.com/PB-405...
• Scroll Saw: https://amzn.to/2TVZEQO
• Scroll Saw Blades: https://amzn.to/2T0AKPB
• Table Saw: https://amzn.to/2RwQTJa
• Ripping Blade: https://amzn.to/30ZOJEV
• Cross Cut Blade: https://amzn.to/3kezMHf
• Planer: https://amzn.to/38LarPW
• Jointer: https://amzn.to/310uabK
• Bandsaw https://amzn.to/3168ElS
• Narex chisels: https://amzn.to/36dM4dk
• Titebond Glue: https://amzn.to/3pjRPAu
• Titebond Liquid Hide Glue: https://amzn.to/2U2o4pM
• Combination square: https://amzn.to/3aPMN6n
• Random Orbit Sander https://amzn.to/2RxjkXo
• 120 grit sandpaper: https://amzn.to/2QW835c
• 180 grit sandpaper: https://amzn.to/39y5kVM
• Briwax: https://amzn.to/321dxxp