Published On Aug 7, 2017
FOLLOW ME ON INSTAGRAM: @modustrialmaker || https://goo.gl/3Yqo2m
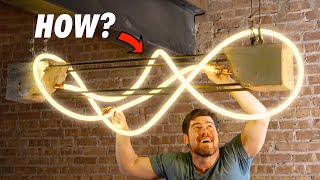
This video shows how to make an LED pendant light from plywood, LED strips, and flexible LED channel. Since I designed this for my living room, the music reactive / sound reactive mode had to be incognito. With this in mind, I used warm white / cool white / amber LED strips, instead of RGB strips. In solid white mode, the rings give off various shades of white for a sophisticated modern look that hides the wild side when you switch the light to music visualizer mode.
The build is fairly simple. Each of the two rings is made of a stack of three plywood rings, where the middle ring has a lesser radius to create a groove for the LEDs. The rings are simple to cut using a circle cutting jig and router. While I programmed an Arduino Mega to do music visualization based on input from a microphone, you can very easily buy an off-the-shelf music controller for individually controllable LEDs, which is basically plug n’ play for the LED strips.
SUPPORT THE CHANNEL:
Buy Modustrial Maker MERCH (Shirts, etc.): https://bit.ly/2RGgVXB
PRODUCTS USED IN BUILD:
Flexible LED Channel: https://www.solidapollo.com/NF12-Neon...
Walnut Plywood: https://goo.gl/GizBrF
Circle Cutting Jig: http://amzn.to/2i5A5JH
Dewalt Router: http://amzn.to/2wPScX8
Suspension Light kit: http://amzn.to/2vIPRgO
GOOD PRE-MADE LED MUSIC CONTROLLERS (if you don't want to mess with Arduino): https://amzn.to/2HZ8B51 or https://amzn.to/2I42PKQ
Another LED Music Controller with Remote and power supply: http://amzn.to/2i5w4EV
Use the above controllers with one of the following types of LED Strips:
individually controllable warm white / cool white / amber (WWA) LED strips: http://amzn.to/2i4hc9Q
individually controllable RGB LED strip: http://amzn.to/2i7oCJI
Links to LED Parts I used for the build:
SK6812 WWA Individually Controllable LED strips : http://amzn.to/2i4hc9Q
Arduino Mega Clone: http://amzn.to/2vDELeD
Electret Microphone: http://amzn.to/2fL4R9T
RF receiver and remote: http://amzn.to/2w1tmGv
RZ dust mask: http://amzn.to/2wM8F1t
Very crude code for this project is here: https://github.com/modustrialmaker/Ri...
CAMERA GEAR I USE:
• Dustsealed DSLR: http://amzn.to/2FFAFJA
• Wide Angle Lens (15-30mm f/2.8): http://amzn.to/2FYCJf4
• 35mm f /2.0 lens: http://amzn.to/2pjcTsF
• Cheap, but AWESOME 50mm lens: http://amzn.to/2GydHkw
• 100m f/2.8 Macro lens: http://amzn.to/2FIl7oc
• Go Pro Hero 6: http://amzn.to/2Gzvkk0
• Smartphone Gimbal: http://amzn.to/2phQcop
#diy
#pendantlight
#woodworking
#woodwork
#woodworker
#chandelier
#diylight
#diylamp
#ledlights
#howtomake
#diylamp
#ledlight
#arduino
#musicvisualizer
#musicreactive
#soundreactive
#LED