Published On Dec 12, 2021
Plans for the jig and a limited supply of pre-built jigs are now available on Etsy:
https://thesnekkershow.etsy.com
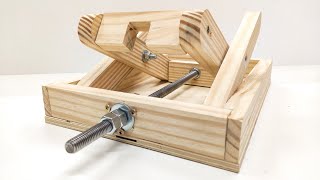
By viewer request, this video shows how to build a jig that I previously demonstrated for making cheese and cracker serving trays (see • Cheese and cracker serving trays (Se... ). I produced that video two years ago and thought that the jig was pretty self-explanatory, but when I pulled it off the wall for the rebuild, I spent some time scratching my head trying to figure out what I did. Hopefully, this clarifies everything and preserves the process so that we don't need to remember all of the details.
You can also find me on:
Instagram: / thesnekkershow
Etsy: https://thesnekkershow.etsy.com (woodworking stuff)
Etsy: https://generalvarietyvault.etsy.com (non-woodworking stuff)
Ko-fi: https://ko-fi.com/thesnekkershow
Printables: https://www.printables.com/@SnekkerSh...
And even here: / @relaxing-naptime-music
Find products I like on my Amazon storefront:
https://www.amazon.com/shop/thesnekke...
These are the two router bits I use in this video:
Whiteside bowl and tray bit: https://amzn.to/38LAetO
Whiteside ultimate pattern bit: https://amzn.to/3oNdFKZ
To make the trays, you will also want these two bits:
Whiteside 1/8” roundover bit: https://amzn.to/3ikLBMD
Whiteside 1/4" roundover bit: https://amzn.to/39Eny7E
Other things you might need for this project:
Impact resistant super glue: https://amzn.to/31Tm74Q
Gloss polyurethane: https://amzn.to/3m02HCr
Chapters
00:00 Introduction
0:53 Planned improvements
4:10 Make a template template
15:22 Transfer to the final template
19:25 Router-table kickback
21:36 Make the bottom guides
29:11 Add reference marks
32:55 Conclusion
This video is not sponsored. I paid for everything and used my own time. As an Amazon Associate, I may earn a small commission if you use the Amazon links to make a purchase.