Published On Sep 22, 2024
Check out Bambu Lab A1 3D Printer:
https://influint.link/RyanHawkins_Bam...
#bambulab #bambulabA1 #makerworld #bambustudio #bambulabp1s #bambulabs
Business inquiries: [email protected]
Website: https://www.westcoastboards.ca/shop-1
Instagram: @westcoastboards
TikTok: @westcoastboards
Facebook: / ysemh2ktosxrkh1b
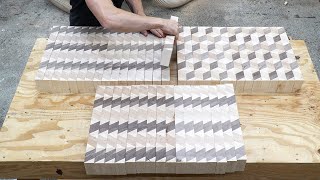
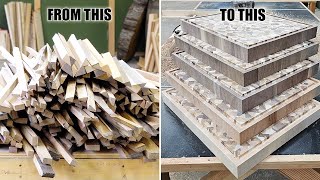
Deep diving my step by step process and walking you through how to create a 3D zigzag patterned end grain cutting board. This process can be used to create a variety of different looking boards depending on woods used. Below are the time stamps to all the steps and also links to most things I use in my shop:
0:00 Introduction
1:23 Step 1 - Get some wood
2:27 Step 2 - Cut wood to length on miter saw
4:40 Step 3 - Mill the wood (plane)
7:22 Step 4 - Mill the wood (joint)
7:53 Step 5 - Pair up the maple/walnut boards
8:54 Step 6, Pt. 1 - Glue-up #1
12:03 Bambu Lab 3D Printers
16:03 Step 6, Pt.2 - Strip/scrape Glue up #1
17:15 Step 7 - Flush ends on maple/walnut boards
17:50 Step 8 - Rip bevelled edge on each glue up
18:47 Step 9 - Rip into bevelled strips
19:38 Step 10 - Square off walnut side of strips
20:49 Step 11 - Cut up cherry/walnut at miter saw
24:18 Step 12 - Plane cherry & walnut
24:57 Step 13 - Joint edge on cherry/walnut
25:06 Step 14 - Square off maple side
26:26 Step 15 - Rip cherry & walnut
28:58 Step 16 - Glue up “sticks” (Glue up #2)
36:12 Step 17 - Strip and scrape “sticks”
38:48 Step 18 – Plane the “sticks”
43:24 Step 19 – Flush trim ends of “sticks”
43:58 Step 20 – Panel pattern assembly
46:41 Step 21 – Panel glue (Glue up #3)
50:49 Step 21A – Strip/scrape the panels
52:08 Step 22 – Plane panels
55:39 Step 23 – Flush trim ends of panels
57:43 Step 24 – Cut end grain strips
58:10 Step 25 – My opinion on thickness of end grain boards
59:34 Step 26 - Final pattern assembly
1:03:32 Step 27 – Final glue up (Glue up #4)
1:08:35 Step 28 – Strip/scrape boards and let rest
1:10:50 Step 29 – Flattening
1:15:10 Step 30 – Drum sanding
1:16:19 Step 31 – Belt sanding
1:17:48 Step 32 – Trim sides on the jointer
1:21:20 Step 33 – Sanding (broken into 7 substeps A-G)
1:25:37 Step 34 – Oiling the boards
1:28:01 Step 35 – Applying beeswax
1:31:06 Step 36 – Install rubber feet
1:31:59 Step 37 – Wax top of boards (Final Step)
1:32:16 Step 38 - Taking finished pictures & packaging up process
1:34:11 Step 39 – Material calculation
1:37:41 Step 40 – Quick cost breakdown
1:38:13 Conclusion/farewell
▶️ More of my videos
One of a Kind Dining Table
http://y2u.be/jCm-JQRkTgY
Farmhouse Dining Table Made Entirely from Pallets
http://y2u.be/JhEVEdB7fPA
Coffee Table with 3D Pattern Top
http://y2u.be/npjxCYLcuFs
How It's Made - 3D Patterned End Grain Cutting Board
http://y2u.be/Jrh_g79Rzh0
From Barrel to Butcher Block
http://y2u.be/uiu0Hkd6mb0
Links to products used in this video:
Clark's Oil: https://amzn.to/3xutIqN
Beeswax: https://claphams.com/product/beeswax-...
TotSled Router Sled System: https://totsled.com/
Router Flattening Bit: https://amzn.to/3qrntAp
Cutting Board Feet: https://amzn.to/3Y3dnnz
3M Cubitron Ceramic Abrasive 6" sanding discs: https://amzn.to/3ScCsaD
Freud Glue Line Rip Blade: https://amzn.to/3iW1gE5
Diablo 80 Tooth Fine Finish Blade: https://amzn.to/3AOU1Up
GRR-RIPPER 3D Push Block: https://amzn.to/3xVopuF
Gravity Heel Kit For GRR-RIPPER: https://amzn.to/3D08oHI
3M BlueTooth Hearing Protection: https://amzn.to/2VVVB8v
Silicone Glue Brush Rockler: https://amzn.to/3yZumrH
Tape Measure Stanley: https://amzn.to/2XvzKox
Pipe Clamp ¾” Bessey: https://amzn.to/3iV9KLL
F-Style clamps Bessey: https://amzn.to/3k2KhPL
Titebond III Glue: https://amzn.to/37OE44p
Camera Tripod: https://amzn.to/2XCxT1q
Sony A6400 4K Camera: https://amzn.to/3hRPR78
Iphone Tripod Mounting Bracket: https://amzn.to/3m8pptb
Belt Sander Makita 4”x24” : https://amzn.to/3g95WEY