Published On Apr 27, 2020
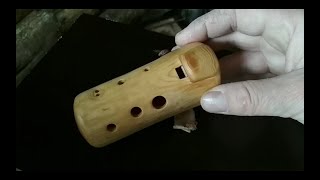
It took me a bit longer than anticipated, but it is finally completed: A fully primitive, functioning "native american" style flute. It is made from a particularly nice branch of Elderberry (sambucus) and only using primitive stone and wooden tools.
To build such a flute, you need a branch with a bore as wide as possible and a distance between the knots as far as possible. This is also the reason why this project took a bit longer to complete than I expected: I needed to find a suitable branch first.
I wanted a flute tuned to C5 (523 Hz). This calls for a sound chamber (the part of the flute below the sound hole) to be about 30 centimeters long. The ratio between sound chamber length and bore width is important: If the bore is too narrow, the flute won't play the base tone, but instead jump to the first overtone right away. Through several prototypes, I found out that for a flute to play a C5 cleanly, the bore needs to be at least 15 millimeters wide. My last prototype (that you see in some parts of the video and in the outro of the whistle video) only measures 13 millimeters and it really struggles with the lowest note.
If you can't find a branch with the right bore width, you can make a flute with a higher base note. This might force you to move the finger holes closer together, though.
Talking about finger holes: I worried and researched a lot about this before I started my flute project. But it turns out that finger hole placement isn't an exact science. That is because there are two factors that determine the frequency of the sound produced by a hole:
- The distance from the sound hole (the closer, the higher the note). This one is obvious.
- But also the size of the finger hole (the wider, the higher). This is what allows a musician to play half notes by covering holes only halfway.
So, to tune the flute, you can put the hole approximately where you want it, and then carefully widen it until it produces the sound you want. Just don't make them too narrow, or they will sound a bit weak.
A few more things I picked up along the way:
- Keep an eye on the wall thickness at the finger holes. If the wall is too thick, the holes higher up will produce turbulence that disturbs the notes further down. This is why I thinned the wall around the finger holes, forming small cups for the finger tips.
- Probably for a similar reason, tuning the higher notes affects the pitch of the lower ones slightly. This was also the only process I encountered that lowered the pitch produced by a hole. So, if you have tuned one of your lower notes a bit to high, don't despair: Tune the ones further up, the problem might just fix itself.
- When searching for an appropriate branch, look for the ones that grow straight upwards and that have a fresh, almost shiny bark. Check for the right knot spacing before cutting it off - you don't want a knot in the middle of the sound chamber.
- However, you DO want a knot where you will put the wind and sound hole. This is because the bore is slightly narrower at this point, allowing you to pressure-fit the plug right between the two holes.
Some helpful resouces I used for this project:
- Blue Bear Flutes ( / bluebeararts )
- Clint Goss ( / clintgoss )
- Far North Bushcraft And Survival ( / phreshayr )
- flutopedia.com (https://www.flutopedia.com/)
If you want to make your own flute, a good beginner project would be to make a whistle first. Check out my video on how to make one here:
• Primitive music 1: Making an elderber...
#primitivemusic #bushcraft