Published On Oct 31, 2021
👉 MY VAN HAS LEAKED! In this video, I discover why my tiny camper conversion is leaking and share how I went about fixing it so, hopefully, it doesn’t happen again!
🔔 Please SUBSCRIBE to my channel, thanks! 🔔
🔥 Entire van conversion playlist: https://bit.ly/2ZewxLt
📸 Instagram: / yogi.the.van
🚐 Check out the written version on my website: https://thetinycampervan.com/2021/11/...
🔗 Affiliate links that help support this channel:
👉 High density foam sheet for mattress (lots of sizes available): https://amzn.to/3FFUOMf
👉 Thule Wingbar Evo 2 Pack 127: https://amzn.to/3ZaACZO
👉 Thule Rapid System 753 Foot Pack: https://amzn.to/40vzdOE
👉 Thule Roof Rack 3085 Fitting Kit: https://amzn.to/42w2afb
👉 Rubber U-channel edge trim seal: https://amzn.to/3Zbr1Ci
☕ Support the channel: https://www.buymeacoffee.com/LensOfJames 🙏🏻
🎶 Sign-up to Uppbeat through my affiliate link here: https://uppbeat.io/?as=lensofjames
0:00 - Discovering the leak
0:32 - Finding the leaky area
1:25 - The second leak
1:48 - Finding the causes
2:23 - Fixing the leak
3:52 - Testing the repair
---
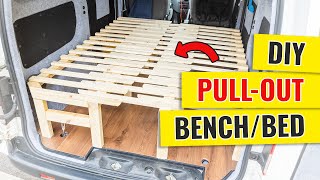
When I opened the back doors of the van the other day, I noticed something unusual about the mattresses for my pullout bench/bench. All 3 of the mattresses were soaking wet at the end nearest the doors & so was the bed underneath.
Luckily the water had been absorbed and hadn’t made it to the floor, but I needed to know why this had happened & how to stop it happening again. I was relieved that the walls were dry, but noticed the ceiling by the back door felt wet.
My first thought was that it was the plugs which cover the roof bar mounting holes. But I had sealed them in & they were still intact. My next guess was that the rubber u-channel seal on the doors had failed but it wasn’t that either & the doors were completely dry. Next, I checked the door seal which runs around the entirety of the back door opening. There were no cracks, holes, tears or anything else that might cause concern.
So I pulled the seal away (part number 90210) to check underneath & find where the water had got in. There was a damp patch just on the curve, so the water must have found its way in under the seal & dripped onto the mattresses all night.
After working out how the water got in, I wanted to work out why it had got in, but before I got a chance, more heavy rain came along so I put the seal back on, took the mattresses inside to dry & left a bowl on the bed to catch any water.
Unfortunately, it did. The next morning there was water in the bowl, as well as a very obvious location of entry on the ceiling.
There were 3 things that I noticed might be causing the problem & a very important fourth one which I’ll go into later.
First was the amount of dirt on the van. This really wasn’t doing the seal any favours. Second was the excess carpet which I had tucked over the metal to be covered by the seal - the carpet overlap here appeared to be wet. Thirdly, the glue overspray left over from the carpet clearly didn’t allow the seal to sit flat on the metal.
When it was time to get started, I pulled the seal again & began cleaning the seal - inside and out.
The next step was to clean all along the metal lip, first with water to remove the dirt and then with white spirit to get rid of the glue.
The white spirit also helped to loosen up the carpet ends, which I could now trim back in areas they were too long. I wasn’t worried about it being neat, as it would all be covered by the rubber seal - I just wanted there to be less carpet overlap.
As I came to refit the seal, I made an interesting discovery, which is the fourth potential reason for the leak. I discovered that the rubber seal actually has thin, pliable metal running all the way through it, so it can be opened or closed more to fit the object it is attached to.
With this in mind, before refitting the seal, I went round it and closed its gap with my hands.
Then, I could fit it to the van, tapping it firmly in place with my hand, for a tight, hopefully watertight, fit.
And there was only one way to find out…so I put the bowl back in the van and tipped a bucket of water over the roof.
I also set up a camera in the van to create possibly the world’s most boring time lapse & happy that the seal had kept the water out, I put the bedding back in.
The real test came when, a couple of days later, another lot of heavy rain was forecast. I left the camera timelapsing away in the van overnight, and I’m pleased to report that no water has got into the van!
🔔 Thanks for watching and if you’ve enjoyed this video, please LIKE and SUBSCRIBE! 🔔
#Vanlife #NissanNV200 #LensOfJames
DISCLAIMER: In this video, I am in no way stating that this is the proper way to undertake the conversion of a van, however after research and experience using the van, I believe this to be the way that is best suited to my van and the way I intend to use it.