Published On Jan 26, 2023
Click for more info and reviews of this TruRyde Trailer Brakes:
https://www.etrailer.com/Trailer-Brak...
Check out some similar Trailer Brakes options:
https://www.etrailer.com/dept-pg-Trai...
Click for more info and reviews of this TruRyde Trailer Brakes:
https://www.etrailer.com/Trailer-Brak...
Check out some similar Trailer Brakes options:
https://www.etrailer.com/dept-pg-Trai...
https://www.etrailer.com
Don’t forget to subscribe!
/ etrailertv
Full transcript: https://www.etrailer.com/tv-review-tr...
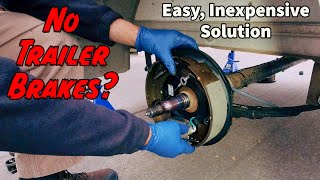
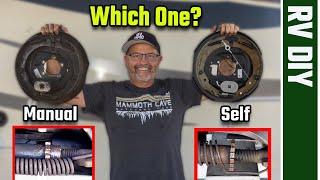
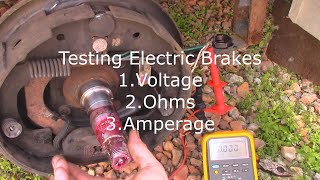
Hey guys, Kevin here at etrailer and today we're gonna be taking a look at and showing you how to install TruRyde's line of self-adjusting electric trailer brake assemblies. The brake pad is made up of a composite material that is chemically bonded to the brake shoe itself and that's important because back in the day, a lot of electric trailer brakes were riveted into place. And what can happen is as your brake pad starts to wear down that rivet's gonna start to show and then it's gonna start making deep gouges inside of the drum. And you don't want that 'cause then you're gonna have to replace your drum on top of replacing your electric trailer brakes. The nice thing about this being self-adjusting is that you're not gonna have to constantly get under there, like you would with manually adjusted brake pads. So what that means is that over time as this wears down, it's not gonna require a whole bunch of labor.
It's only gonna be that initial labor, where you kind of get it set to the correct setting on here, so that it's actually dragging correctly and then stopping correctly. Whereas with manual ones, every so often, you're gonna have to get under your trailer and adjust it yourself every single time. Electric trailer brake assemblies are gonna come in a variety of different sizes and weight capacities. And this is all gonna be really based on the capacity of your axle. So you wanna make sure that when you are adding brakes on or replacing 'em, that you're getting the correct size for your axle.
So get under your trailer, look for that axle tag, figure out what the capacity is and then you can look through our fit guide and find the correct brake assembly to fit that axle. The last part of this is going to be our hub and drum assembly. That's also going to depend on the size of our braking assembly, and also the bolt pattern of our wheel, because we have to get our wheel back up onto that hub. If you have any questions or need any help trying to find the correct brake assembly kit or even your hub and drum kit, then please reach out to us via our customer service line or our Ask the Expert link. And then I or one of my coworkers will help find the correct stuff for your trailer.
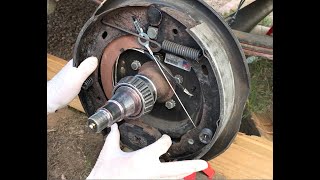
To start up our installation, we're gonna first have to take off our wheels or we can lift up and support our trailer, so that our axles can hang. I've already gone ahead and lifted up the trailer. I have it on jacks, it's all good to go. I just need to take these wheels off. So I'm gonna go ahead and do that now.
If you don't have an impact gun then, I definitely recommend doing it on the ground. That way you're not trying to hold the wheel in place and brake it off with a wrench. (impact gun whirring) (metal clanking) To start off our installation, we're gonna first need to lift up our trailer, and we'll take off of our wheel and then we're gonna remove our either hub, so that we can add on our brakes. To do that, we're gonna need to take a rubber mallet and we'll pop off our dust cap, and just kind of smack towards yourself just a little bit. You can kind of see it, start to lift up off of here and just kind of keep working it loose and turning it. (metal banging) You definitely don't need to hit it too hard. We don't wanna end up denting it all up if we have to reuse it. And from there we can go ahead and take a shop towel. Now this is gonna be pretty messy process. You're definitely gonna have a bunch of shop towels laying around and some brake clean. I'll kind clean that up just a bit, make it easier to get off here 'cause our next step is going to be removing our cotter pin and take some needle in those pliers and kind of bend that back straight. Once we have it straight enough, we can start pulling it out. And I'm also gonna wipe that down 'cause we will be reusing that. It's not going to give you it in the kit. Next we can go ahead and take some channel locks, brake our castle nut free, and unscrew it. And then wipe it off some more. I've already gone ahead and pretty much wiped it out. We can spray that with some brake cleaner, and we're gonna go ahead, we got one more washer on there that we're gonna need. We'll just pull our either hub forward, and that's gonna pop