Published On Oct 22, 2020
#KiCad #PCB #Electronics
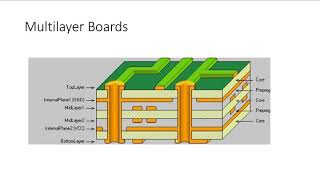
In this video, we show you how to implement a 4-layer board using KiCad. 4 layer board is great to have no cuts in your plane to keep signal integrity good.
We speak about :
- Layer stack up.
- Vias when you have 4 layers, how does it affect it.
- When will you need 4-layer boards?
If you liked this video please think of giving it a like, if you have questions or suggestions, please feel free to leave it in the comments below.
Have a great day!! :)
Below you can find all other useful links that might help you.
📚Altium Tutorials📚
• Altium Designer 20 Tutorials
📚KiCad Tutorials📚
• Kicad Tutorials
📚Let's learn circuit Playlist📚
• Let's Learn Circuits
Building your own Drown
💻All our PCB Design - Github💻
https://github.com/PlumPot55
💻Download your free Altium Designer 20 for 6 months💻
https://www.altium.com/yt/plumpot
-----
Have a great week and stay safe :)
Follow us on: - Website: www.plumpot.co.uk
Instagram: / plumpot_official
Facebook: / plumpot55
Twitter: / plum_pot
Discord: / discord