Published On May 6, 2023
#hutofhandcraft #restoration #toolrestoration #lamprestoration
Second Channel: / @drhutslab
Patreon: / drhutofhandcraft
Facebook: / hutofhandcraft
Instagram: / dr.hutofhandcraft
If you want to support me leave a comment, subscribe and share my work, I really appreciate and it helps me a lot!
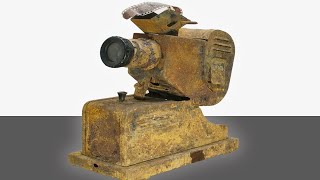
In this video I restored an old german mining lamp which I bought online from a private person.
While doing some research I found out that it was made around 1945 by a company named 'Frivo'.
This project was really fun but also a lot of work. I had to do a lot of planning and also changing my plans a lot.
The brass plating on the small part was pretty straight forward, but it was much more difficult on the big part.
First I had to nickel plate because the copper electrolyte I used is very acidic (pH=1). The layer of nickel protects the steal from getting damaged by the acidic solution.
For this way of brass plating it is very important that the thickness of the last plating layer (in my case zinc) is as uniformly as possible. Otherwise some spots would become brass before others and while heating up more to get the non brass areas to become brass it would destroy the other spots where brass has already formed.
Also it is very important that you have as less bubbles forming on the plated parts while copper and zinc plating as possible, since that would cause the layers to be not as uniformly as you want them to be.
Btw: theoretically it would be possible to first zinc plate and then copper plate. That way you would not need to nickel plate before. But for that order you would need basic copper electrolyte which doesn't harm the zinc (the acidic copper electrolyte would pretty much destroy the zinc). Since I had the acidic electrolyte I just did it the way I did in the video.
About the battery:
The original battery, which probably was a Nickel Cadmium battery, isn't sold anymore. So I had to find a 6V battery that would fit inside and also fill out the inside of the lamp. The batteries I used were the only ones that I could fit in due to the size. But since they are very thin I put two of them behind each other and connected them with the little board I made. That way the two batteries fill out the space and don't wobble around while moving the lamp.
I put them in parallel so I have 6V output.
Fyi: Putting them in series would've given me a 12V output.
The work on the project took about 70 hours (inclusive filming) plus about 45 hours of editing 250GB of video material.
I hope you will have some fun watching the video! If you have any further questions on the process, tools, material, nickel-, copper-, zinc plating or else write a comment, I will try my best to answer your questions.
Disclaimer:
The experiments are only for educational purposes and serve as entertainment.
I am experienced in handling the used substances and I advise everyone who is not a trained professional not to imitate the experiments I show you.
For experiments which could cause potential danger I will not tell you which chemicals I am using to prevent imitating. Those who know what is happening, know the chemicals anyway and probably are trained professionals. :)
Also work on electronics shall only be done by certified professionals.
I am not responsible for personal injury or property damage if any actions shown in the video will be imitated.
I hope you understand.
Until next time :)
Second Channel: / @drhutslab
Facebook: / hutofhandcraft
Patreon: / drhutofhandcraft
Instagram: / dr.hutofhandcraft
Brass plating on a rare 1945 German Mining Lamp! (Full Restoration!) I Dr. Hut of Handcraft