Published On Apr 2, 2021
#frenchcleat #toolstorage #woodworking #workshop #organization #DIY #brattonbuilt
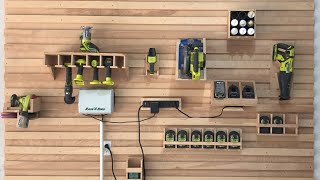
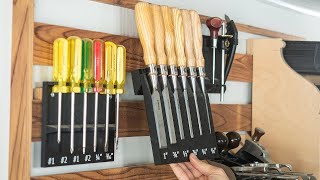
Time to get organized! The french cleat system is an awesome versatile way to keep everything where you want it. What is a french cleat you ask? It's just a board cut with a 45 degree edge. That's it! Cleats are tacked up on the wall with the 45 degree edge on the top, then each hanging item also gets a cleat with the 45 degree edge facing down. The two boards meet up and make a very strong hook that can hold a ton of weight. The french cleat system is great for the woodworkers shop or any garage for tool storage because you can custom make all sorts of shelves, cabinets, holders, racks, or whatever else your wild imagination can come up with. Then you can easily move them around whenever the mood strikes. This video shows how to build a french cleat wall.
DIRECTIONS FOR FRENCH CLEAT WALL BUILD:
PREP:
Decide how wide and how tall you want your wall to be. (The very bottom cleat on the wall is mainly unused for hanging items, but it does serve the purpose of supporting larger items and may come in handy to hang some smaller items.)
Chose a lumber. I chose to use 1×6 pine boards ripped down the center, but you can use whatever you’d like. Many people use plywood. 2/3″ thick wood is good for strength and the wider the board is (in my case 3 inches) the better your smaller items will hang without needing an extra lower piece of wood for support.
Calculate the number and size of boards needed.
BUILD:
First, rip cut boards with 45 degree angles to make the cleats for the wall.
Next, find your studs, then find a friend to help hold the board up while marking where to pre-drill holes that line up with your studs.
Pre-drill and counter sink two holes at each stud location. (Pro tip: Start the screws in your boards before attaching them to the wall to avoid dropping screws everywhere and then possibly losing a screw and finally finding it stuck inside your car tire).
Call that friend back, and then attach the bottom cleat to the wall first making sure to use a level. (You might have to make that friend dinner, especially if they take some initiative and screw in some boards for you.)
I chose to space the cleats 3 1/2″ inches apart, which is the width of a 2×4. 2×4’s do not balance on the cleat on their own. So, if that friend is still around, then you should be good with a couple 2×4 scraps. However, if you’re on your own, then make a cleat out of a 3/4″ scrap to use as a spacer. If you use a cleat as a spacer make sure to leave a little wiggle room or that scrape cleat will get stuck.
Continue attaching the remaining wall cleats.
Badda bing! Your french cleat tool wall is ready for business!
Check out these French Cleat Projects Videos:
Clamp Rack: • French Cleat Wood Clamp Rack (Tool St...
Workshop First-Aid Cabinet: • French Cleat First Aid Cabinet (Works...
Pencil Holder: • How to Make a Wood Pentagon (Pencil H...
Tablet Holder: • DIY French Cleat Tablet Holder/Mount
To see more french cleat builds click here: https://brattonbuilt.com/french-cleat/