Published On Jun 9, 2018
Here is a little something that might be fun to watch. I make some shelves and try to show the process in an interesting way. Just Plywood, Wood Glue, Concrete Screws and Staples.
The plywood is 7/16" and the pine components are 3/4 by 2" actual dimension. All other dimension will be dependent upon individual need.
I buy all my equipment and these industrial sewing machines myself and so anything you do to help is appreciated.
When you purchase anything through the following links, I receive a small commission at no additional cost to you. Thank you for supporting me to make more content on this channel.
Stabila Level R Beam Level https://amzn.to/39GCCA6
Woodworking Compass https://amzn.to/2vSfMH6
The tools and fasteners that I use can be found in this listing.
https://www.amazon.com/shop/alexander...
Here's a list of Items I recommend :
https://www.amazon.com/shop/alexander...
My Filming Gear:
DMC-GX8: http://amzn.to/2sGH40h
My Lenses: http://amzn.to/2tRtFD7
http://amzn.to/2vfMnRd
http://amzn.to/2zQnr9p
Mic: http://amzn.to/2tqmMp2
Softbox: http://amzn.to/2tqrmUj
Bulbs: http://amzn.to/2tN1NiB
Subscribe to My Channel:
https://www.youtube.com/c/AlexanderDy...
Monetary Support is Accepted Here:
/ alexanderdyer
Thank you very much for all your props and support, anything you choose to do will help me to make more content.
Filmed, Edited and Produced by Jason Potts
These plywood shelves are pretty easy to build, you just need to know how big you want them or where they need to fit into. Don't skip the wood glue, it is cheap, easy and very strong. These shelves are strong enough for most household items and they can be painted as you see fit.
I cut the plywood into 2' widths but you can make this width whatever width you want to make your shelves. Also by choosing 2' I have no waste material. Then you will cut the length to whatever you need, I went for the full 8'.
Since I have a table saw I buy wider boards and rip them to size, this way I get a higher quality of wood in the end and I can cut a true 2" width.
Cut the 2" stock to the length of your shelves and glue into place on front and rear edges. I use 1/4" wide staples to hold in place until the glue dries and I am able to move to the next step right away. Remember, staples just hold the materials together until the glue dries. The glue is where much of the strength comes from, not the fasteners.
Now measure between the edge boards for your cross brace reinforcement lengths. Cut enough to place them every 18 to 24" and on each end of the shelf and glue into place. If you are using fasteners like I do, be sure to measure to the center of your cross braces and mark a line for accurate fastener placement, you will be glad you took the time.
Cut yourself some scraps to hold the back of your shelf up where you want to attach the shelf to the wall.Cut some front vertical legs from the 2" stock long enough to reach your top shelf. Use these to mock your shelf into place and level.
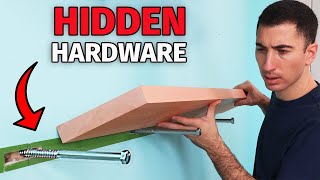
Once you are satisfied that you have your shelf where you want it prepare to drill through the back edge of the shelf and into the concrete. You will need a hammer drill and appropriately sized masonry bit for this step. You want your connectors to extend into the concrete about an 1 1/2" and space them about every 18"
For the front legs I glue the leg to the shelf and I also glue a cleat under the shelf on the inside of the leg for added support. Space your front legs about every 3 to 4' depending on anticipated load
Repeat these steps as necessary and then enjoy all your new storage space.