Published On Jul 17, 2019
Tinting the windows of your car, truck or SUV can add style and comfort to your driving experience, as well as helping you protect your interior from light, glare and ultraviolet rays. Installing window tint on your vehicle is a straightforward procedure we will outline in this video. Gila offers several types of tint, as well as an installation kit that includes everything you need to tint the windows of your car.
It’s important to know the tint laws for your state before choosing a Visible Light Transmission percentage, or VLT. For information on each state’s tint laws, visit https://iwfa.com/news-events/state-la..., then select the US State Law Chart.
Full job and supplies: https://www.oreillyauto.com/diy-insta...
Supplies Needed for This Job:
1. Safety Glasses: https://urlzs.com/hbwc
2. Gloves: https://bit.ly/2GvfwAm
3. Gila Window Film: http://bit.ly/2LXGc02
4. Gila Tint Application Kit: http://bit.ly/30C0HDg
5. Transparent Tape: http://bit.ly/30DKw8B
6. Razor: http://bit.ly/2W9OnbM
0:00 Welcome Back
0:32 Cut Film to Size
2:45 Clean the Inside Window
3:43 Prep Tint
4:15 Install the Tint
6:12 Remove Bubbles
6:58 Post-Install Tips
Facebook: / oreillyautoparts
Instagram: / oreillyautoparts
Twitter: / oreillyauto
Find your local O’Reilly Auto Parts: https://www.oreillyauto.com/locations
Discover Aztec 200 desert racing: https://bit.ly/4b3qMiu
Shop all your automotive needs: https://www.oreillyauto.com/
Subscribe and ring the notification bell! http://bit.ly/2bTyluF
On our channel we cover several different topics:
Automotive Product Overviews
Do It Yourself Automotive Repair
DIY Auto Maintenance
Simple Automotive Diagnostics
Automotive and Vehicle Education Videos
O’Reilly Auto Parts is an auto parts retailer that provides automotive aftermarket parts, tools, supplies, equipment, and accessories in the United States serving both the professional service providers and do-it-yourself customers. From our roots as a single store in 1957 to our current size of 5,219 locations (and growing), we've come a long way. We pride ourselves on offering well researched, and reliable automotive information on our channel.
#OReillyPowered #CarRepair
#TeamOReilly #CarMaintenance
Transcript:
It’s important to know the tint laws in your state before applying tint to your vehicle. Visit iwfa.com for information on that. Also, be sure to do this job in a shaded, well-lit, dust free environment. If you’re not completely comfortable doing this yourself, we’d be happy to recommend a professional technician in your area.
If you have decided to do this yourself, gather your supplies, and let’s get started.
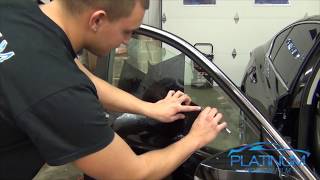
You’ll begin by using the outside of the window as a pattern for the film. So, the window needs to be very clean. Spray the exterior glass wet with the Gila Application Solution. Then use a low-lint cloth or squeegee to dry the glass.
We will be using Gila Window Film. This film has a liner side that protects the adhesive. It is important to identify the side with the liner. The liner side is rolled to the outside and is slick to the touch. If you rub the tint against itself, the sticky side is the tint and the slick side is the liner.
Wet the outside of the window with the application solution.
Roll the film, liner side facing out, onto the glass… keeping in mind that the tint will be applied to the interior side of the glass.
Using the soft rubber edge of the squeegee, stroke gently down the film to temporarily hold it in place for trimming.
Trim away the excess film and set the remaining roll to the side.
Next, position the film ¼” to ½” below the top of the inside gasket and wet the outside of the film.
With a sharp blade, trim along the window seals of the vertical edges first. To avoid damage to the glass or seals when trimming, press on the knife gently while keeping a low angle. Use only enough force to cut through the film and always tear excess film away from the cut.
Before trimming the top edge, gently lift the film from the bottom of the glass so the film does not crease when the window is rolled down.
Open the door and roll the window down about 2 inches.
The top of the glass should now be exposed. Use the top of the glass as your blade’s guide, and trim the film to the edge of the glass. Take your time and make a clean cut.
Reposition the film slightly and carefully round out any corners that aren’t smooth. The film is now cut to fit.
Now, move to the interior glass. Spray the inside of the window and thoroughly clean the glass with a low-lint cloth and squeegee. Use a razor or plastic scrub pad for any stubborn spots. Remember, any dirt left behind will cause bubbles in the film. Be sure to wipe down all seals where dirt may be trapped.
*View full video for complete instructions*