Published On Sep 22, 2024
Links to Tools, Materials, etc. ⬇️
Rapid Set 24/6 Concrete Mix: https://www.ctscement.com/product/cts...
Mud Mixer: https://mudmixer.com/andrew
Hoft Privacy Panel System: https://hoftsolutions.com
Vigo Shower Panel: https://amzn.to/4eyVHpf
All Set Tile Mortar: https://www.ctscement.com/product/all...
Metal Drilling Tool: https://amzn.to/4dun1nH
Gate Latch: https://amzn.to/3zqTCfW
Shower Drain: https://amzn.to/3MQcbgT
Laser Level: https://amzn.to/3Zy0iUq
Tiling Trowels: https://amzn.to/3MTxFJG
Tile Diamond Polishing Pads: https://amzn.to/3MSoCIT
My Mom has been talking about how much she would love an outdoor shower for years... So this past summer, I finally built her one!
Unfortunately, however, the best locaiton for the outdoor shwer was right next to the home's foundation - which introduced a few complications in terms of drainage, etc.
To build this DIY Outdoor shower, I followed these general steps:
1. Excavation:
I had to excavate the area around 10"-12" to give myself a level and firm base to build on. We rented a mini-excavator for this which made the process way easier. This was my first time operating a mini-excavator and it wasn't to difficult.
2. Drainage:
After excavating, I dug a trench for the the shower drain pipe. I put 18" of stone in the trench and then positioned a piece of 2" PVC pipe within the trench to serve as the drain. After sloping the pipe, I backilled the entire trench with stone.
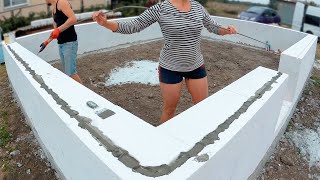
3. Building the Conrete Shower Pan:
For my outdoor shower design, I first built a 4'x6' perimeter concrete "curb" to serve as the shower pan surround. I made the curb 8" wide, built the forms using 2"x6" lumber, and mixed the Rapid Set 24/6 Concrete Mix with the Mud Mixer. Next, I put the shower drain in place and poured a concrete sloped shower pan. You ABSOLUTELY need a rapid setting concrete like 24/6 mix if you want to try and slope a shower pan.
NOTE: Rapid Set 24/6 Concrete Mix is suitable for Foot Traffic in 8-10 hours and reaches structural strength in 24 hours.
4. Tiling the Shower Pan:
After letting the 24/6 concrete mix cure overnight, I tiled the shower pan. I used Rapid Set's All Tile Mortar for the thinset and I installed large format tile that my mom picked out. All Tile Mortar can be used as the thinset for all tile types and sizes. After letting the thinset cure for 5+ hours, I grouted the shower pan tiles.
NOTE: You don't NEED to tile the shower pan. You could also just seal the concrete shower pan and use that as the actual pan.
5. Supply Plumbing:
For the shower supply plumbing, I tapped the CPVC hot and cold water lines in the crawl space. I cut the pipes using a snap cutter, installed a branch tee, and then glued everything together using CPVC primer and glue.
6. Shower Panel Walls:
For the Walls of the Shower, I used the HOFT Privacy Panel System and thier composite board slats. This system was super easy to install. I mounted the vertical posts to the concrete using expansions anchors and then placed the composite slat boards in between the two posts.
7. Installing the Shower head / panel:
I used a Vigo Shower Panel for this project and I attached it to the HOFT walls using some bolts. This shower panel is awesome since it has the shower head (obviously), but also a body spray and spray wand function.
8. Final Touches:
To complete the outdoor shower build, I caulked around the perimeter of the shower pan, built the shower door (using HOFT posts and composite boards), and installed the gate hardware.
Overall, I am really happy with how this outdoor shower turned out. I made one HORRIBLE error when it came to tiling, so let me know in the comments if you "caught" the mistake.
My mom has told me over 100x how happy she is with the outdoor shower and I am glad that I was able to make it happen for her.
Be sure to subscribe and hit the notification bell so you don't miss any future videos! I have some big plans for the font of the house that I hope will boost the curb appeal!
Follow me on Instagram: / atimprovements
Check out my Blog: Atimprovements.com
Subscribe to my YouTube Channel ⬇️ https://www.youtube.com/c/AndrewThron...
Check out my Website for additional DIY Content: https://atimprovements.com
▬
🛠🧰 Other TOOLS THAT I USE
Carbide Tipped Drill Bit: https://amzn.to/3S0hdIM
Drill: https://amzn.to/3JICKkk
Circular Saw: https://amzn.to/3BFotC4
Masonry Drill: https://amzn.to/36yP1JW
Level: https://amzn.to/3HowUDn
Clamps: https://amzn.to/3HLqwpK
Sawzall: https://amzn.to/3HcdeSI
Circular Saw: https://amzn.to/3BFotC4
Bar Clamps: https://amzn.to/3JjFrJe
▬
Thank you so much for watching!
*All content on the Andrew Thron Improvements YouTube channel reflects my own opinions. Please seek out guidance of professionally trained and licensed individuals before making any decisions. Links in the description may be affiliate links.