Published On Sep 11, 2022
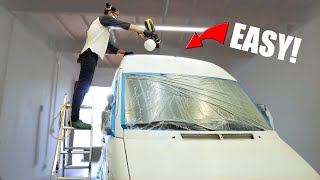
In this video I'm treating treating rust on my van. By sanding the van paint, priming the surface, colour-matching the base coat and applying a clear lacquer I hope to repair the damage and stop it being a problem in the future.
Also, this video was meant to be one of my Youtube #shorts, but I shot so much footage and wanted to talk through my process, so it soon got beyond 1 minute. That's why it's filmed in a vertical format, sorry!
🔔 Please SUBSCRIBE to my channel, thanks! 🔔
🔥 Entire van conversion playlist: https://bit.ly/2ZewxLt
📸 Instagram: / yogi.the.van
🚐 Check out my van blog: https://thetinycampervan.com
☕ Support the channel: https://www.buymeacoffee.com/LensOfJames 🙏🏻
🎶 Music via Uppbeat, sign-up through my affiliate link here: https://uppbeat.io/?as=lensofjames
If you're interested in anything I've used in my van build and would like to support my channel, you can use my affiliate links below. I receive a small percentage of the sale which help support this channel. Thanks!
👉 Paints4u Nissan NV200 QM1 van paint kit: https://amzn.to/3FKpQTu
👉 PROTOUCH QM1 polar / storm white car paint set: https://amzn.to/40smlsD
👉 3M Spray Paint Respirator 4255+: https://amzn.to/3JL5vyG
👉 Masking tape: https://amzn.to/40tpBEd
👉 Polythene dust sheets: https://amzn.to/3Z7UwF6
0:00 - Intro
0:23 - Cleaning & sanding the roof
1:03 - Priming the roof
1:36 - The paint kit I'm using
1:52 - Painting the roof
2:42 - Applying lacquer
2:49 - The finished roof
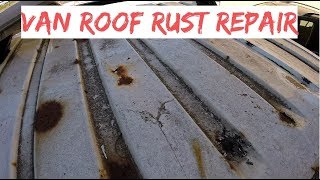
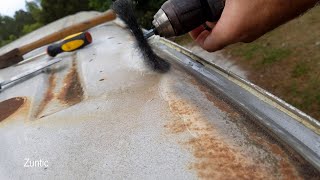
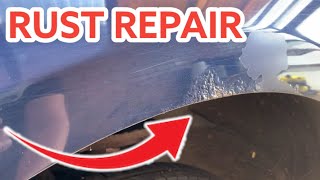
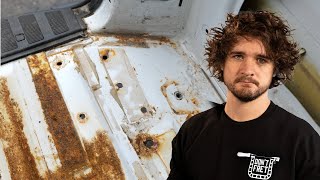
I’m pretty lucky that my van’s in great condition but I noticed four spots of rust on the roof and, after putting off repairing them for longer than I care to admit, I’m now tackling it.
I don’t know what caused the areas to start rusting and it appears some paint was applied to cover them, but it’s degraded quite a bit and I definitely want to get them sorted so they don’t cause any further damage to the roof.
I started by cleaning the van roof and then masking off the area I’d be working on, before I started sanding the first rust spot.
It’s an odd feeling to be sanding the paint of your vehicle, but having drilled and cut into the van already during my van build, it’s becoming a little less daunting now. I should say at this point that my knowledge of treating rust is non-existent, so what I’m doing is based on my own research. No one really sees the roof, so it’s a good place to attempt a repair and I’m not too worried about it being perfect - as I know it won’t be!
I used 120 grit sandpaper to get started and, where I could see the rust had penetrated a little deeper, used a rotary tool to tackle these bits.
With all four rust spots sanded, I cleaned the area down thoroughly to get rid of any grease, dust and dirt and applied my first layer of etch primer. This is to cover the bare metal and it fills any scratches from the sandpaper leaving a very smooth, grey surface.
After sanding the first layer of dried primer back, I applied a second thicker coat. Once this had dried it started raining so I removed the newspaper and feathered the edge of the primer with some wet 400 grit sandpaper before finishing for the day. If you’re interested, these are the paints I’m using on the van - there’s an etch primer, the white base coat, colour-matched to my van, and a clear lacquer to finish. The set cost about £25
The next day I re-lined the roof with polythene sheets, as the newspaper had been leaving some ink marks on the roof, and could continue with the third coat of primer. By this point, the bare metal was well and truly covered, so after leaving it to dry and feathering the edges again by wet sanding, I could begin applying the white paint.
I colour matched the paint with the colour of my van via the code on the driver’s side door frame. The nozzle wasn’t very good on this can, so I swapped it out and then applied a few more coats, gradually widening the masking tape so as not to leave any lines around the painted area.
The grey primer gradually disappeared under the white paint and by the fourth coat it was looking really good. I was surprised at how much of the roof I ended up covering with fresh paint as the rust only covered a small area, but the area widened fairly naturally as I blended the new paint with the old.
I don’t have much of a shine to my van so applied some clear lacquer and found that it matched the existing paint pretty well without much polishing.
I’m really happy with the finish and, although not perfect, I don’t think it’s too bad for a novice.
🔔 Thanks for watching and if you’ve enjoyed this video, please LIKE and SUBSCRIBE! 🔔
#Vanlife #NissanNV200 #LensOfJames
DISCLAIMER: In this video, I am in no way stating that this is the proper way to undertake the conversion of a van, however after research and experience using the van, I believe this to be the way that is best suited to my van and the way I intend to use it.