Published On Nov 5, 2020
http://www.ronhazelton.com
Ron's new video shows how to update an outdated kitchen countertop and backsplash. Learn step-by-step how to cut and lay attractive Ceramic Tile for your Kitchen Countertop and Backsplash
Follow Us On Twitter: / ronhazelton
Like Us On Facebook: / ronhazeltonhousecalls
View Our Pinterest: / ronhazelton
Transcript:
Now there's Southern California and Northern California and then there's way up north California and that's where we're headed today to the town of Eureka to visit Tim and Jeanie Tillman, who've lived with a very, shall we say, prominent kitchen countertop for way longer than they care to admit.
So you guys got a countertop that needs rescuing us.
We sure do.
Oh, I'd love to see it.
OK, its a real eye opener.
Wow. Oh boy, that gets your attention, doesn't it?
Yeah, it really does.
I'm sure this is going to be coming back into style very, very soon. You sure you want to show you want to take it out.
We'll put it on eBay.
All right. All right. So what were you thinking here? I know you want tile.
Tile would be very nice. Something to warm up the kitchen, maybe an ivory, something to kind of go along with the warmness of the wood.
After turning off the water and disconnecting the plumbing below, Jeanie and Tim lift out the sink. Next to go is the vintage green countertop. Ready on three. One, two, three “Lift if up” ah yep coming free.
Our new countertop will consist of three layers. First, plywood for support and strength, second, a concrete waterproofing panel and finally, the tile. Now, this is the plywood that we're going to be putting right on top of your cabinets. It's three quarter inches thick. We're going to be cutting this with a circular saw, have you used that before?
No, I haven't.
After I show Jeanie how to operate the circular saw, she really gets the hang of it. Tim and Jeannie place the plywood foundation on top of the base cabinets and drive in several screws to secure it in place.
Now we have to cut a hole for the sink. Earlier, I traced the outline of the existing sink onto a piece of cardboard, cut out a template and marked it's center along the front edge. Next, we mark the center of the sink opening and we align the center marks on the template with the center mark of the opening. OK and then we can trace the outline since you're putting the whole sink back in here.
And take it from here.
Ok
Thank you.
Tim traces the outline of the template and then begins cutting the opening with a jigsaw. Hold up there. I'm going to put a couple of blocks on over here. Actually, one, these blocks will prevent the sink cutout from crashing into the cabinet below as Tim completes his cut. OK, see how nicely that works, no binding the blade, no falling through. As he finishes, we simply remove the screws from the countertop and lift the cut out portion away.
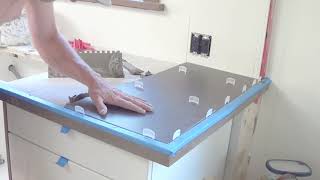
With the plywood in place, it's time to start on the reinforced concrete panel called concrete board or backer board. We cut this to the proper width by scoring the surface with an inexpensive scoring tool and then simply breaking it along the score line. Next, Jeanie uses a spiral cutting saw fitted with a masonry bit to cut the sink open. We apply fast, drying, thin set mortar to the plywood, using the notched side of a trowel to create quarter inch high furrows or ridges. Then lay the concrete board in place and attach it with galvanized nails. So then come down, there you go. So down here you're going to have a fairly good sized tile.
Now we're ready to start tiling. First, though, we do a test run without mortar. The object here is to come up with a layout that looks balanced and avoids unsightly narrow pieces. With our layout decisions made we begin with the edges. Because the wood underneath can expand and contract, cracking "L" shaped edge tiles like these, we'll use two different adhesives, a flexible tile mastic on the sides and thin set mortar on the top. With the edges done, we're ready to start on the field tiles. Once again, the notched edge of the trowel is used to create uniformly high ridges of mortar. Now this guarantees consistent thickness and ensures the face of the tiles will be flush and flat.
How's that?
That's good.
We insert vinyl spacers to keep the joints the same width and frequently check the rows to make sure they're straight. Hold that in place, just like you're doing. As we approach the sink, it's time to cut our first tile. Right Tim, so this is where we have to make our cut, we've got to cut this piece off right here. This is a scoring type tile cutter, very simple to use.